

Little die-cast cars. Who doesn't still love 'em?
Once again, five out of six ain't bad and all from the same camera-phone and YEAH! They all came in, in the proper orientation!
Cheers,
TJ
Beverly Hillbillies
Moderators: rickf, raymond, Mr. Recovery
Re: Beverly Hillbillies
You do not have the required permissions to view the files attached to this post.
Re: Beverly Hillbillies
A bit of progress yesterday.. Front output shaft yoke refurbished with a NOS sleeve and a fresh coat of paint.
Paired with a new seal, this will button up the transfer case/trans very nicely.
A shot I rarely take and a view I don't often get to see. I think I have actually sat in this thing 3 or maybe, four times. So, here are a couple of views forward, through the cockpit.
New parts! What a joy. I decided to spend some money with suppliers I don't normally use (owing to distance) just to spread some of the money around during these trying times. Thank you, George at Army Jeep Parts! George took the additional time to call me back to ensure that my order, which was rather small, was still filled correctly. Great service!
Cheers,
TJ
You do not have the required permissions to view the files attached to this post.
Re: Beverly Hillbillies
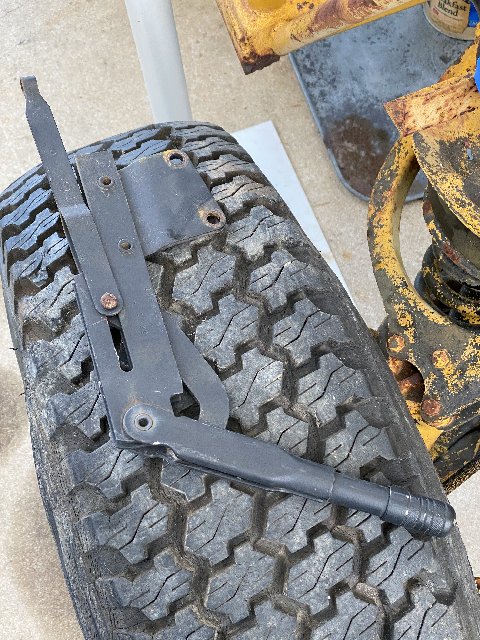
Spent a little time yesterday pawing through the pile of stuff that was formerly hung on the Alley Cat. Came up with some goodies.
A refurbished set of axle shafts and, not pictured, a second set of axle shafts, which are not yet refurbished. I'll install the ones I've already done and compare the ones I take out to the other set from the Alley Cat. Those that are the best will get a makeover and go back in. Then, those will be swapped into the Doom Buggy.
Compare the next two photos. Tell me what you think.
The NOS grill came, still in the box. It was produced in 1988 and it has a manufacturing defect. The supplier, a trusted name in our hobby, was surely unaware of the defect as the box was never opened until I got it. I'm perfectly happy with it since this particular application doesn't require perfection. I like the look and it's a subtle 'tip of the hat' to this rig's heritage.
Pretty sloppy work, if you ask me.
Cheers,
TJ
You do not have the required permissions to view the files attached to this post.
Re: Beverly Hillbillies
Oh boy...what a long day but progress is being made! Some money saved, some money spent. Some curses and some Hallelujas uttered!. Stay tuned.
Re: Beverly Hillbillies
Ok, kiddies. Strap in. This is gonna be a long one.
Regarding the matter of selecting useful things from the pile of parts that was once the Alley Cat...
Another trans-brake lever (because I've discovered that the one on the Doom Buggy doesn't want to adjust) and at the moment, I have bigger fish to fry than to have to fool around with it...
And all these lovelies, all cleaned up and ready to go...
And a reasonably nice set of composite lights because this will have brake and turn lights for flat towing.

Now, I turn my attention to the long overdue matter of being able to stop or NOT being able to stop...depending upon your point of view.
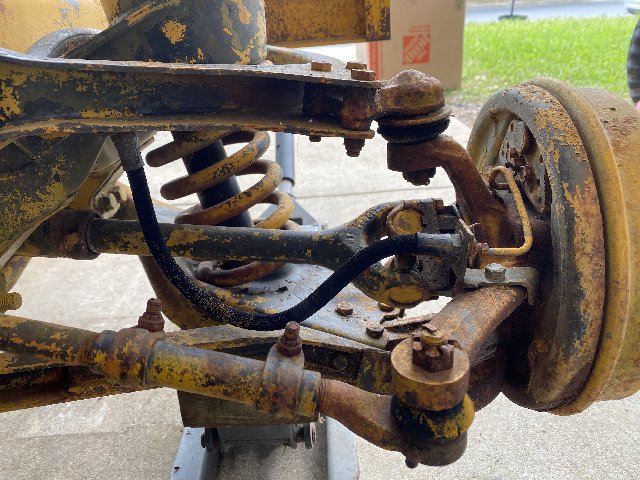
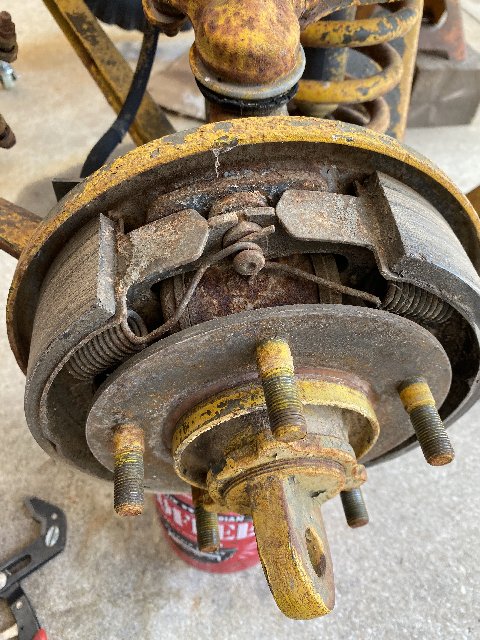
BRAKES! Yes, brakes. The unsung heros of every motor vehicle. So let's have a look at the right front to get an idea of what we're going to need in parts.
Since ALL the wheels of the Doom Buggy are technically "front axles" whether they are on the front or the rear, we need to remember two things. Everything we need, parts-wise, relates to front axles with the notable exception of wheel cylinders which shall be sized and installed as required on any M151 - two 1" wheel cylinders for the fronts and two 3/4" wheel cylinders for the rears....because TJ likes to stop in a straight line whenever possible.

And isn't a spectacular treat to be able to get at and actually see everything?

And remember what we just said. The soft, or flexible brake line kit you'd normally buy for your normal M151 will not do for our needs.
in this application, we're going to need two sets of front soft lines.
The drum comes off with just a little resistance and a lot of West Texas acreage spills out...
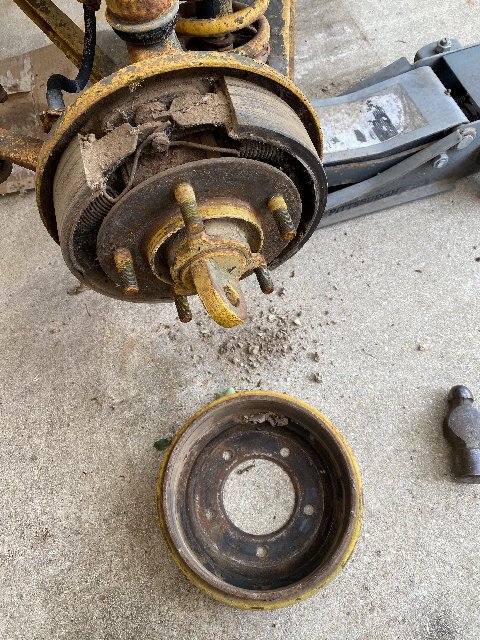
And a little wildlife scrambles for cover...

It looks creepy in there, like Raiders of the Lost Ark...
If you have a good eye, you'll notice the front shoe (bottom) is sort of canted outward, ever so slightly.
Because something is missing...
And because the shoe is not being kept properly aligned it's rubbing against the inner face of the drum. Luckily, these wheels haven't been turning very much lately so no harm has been done.
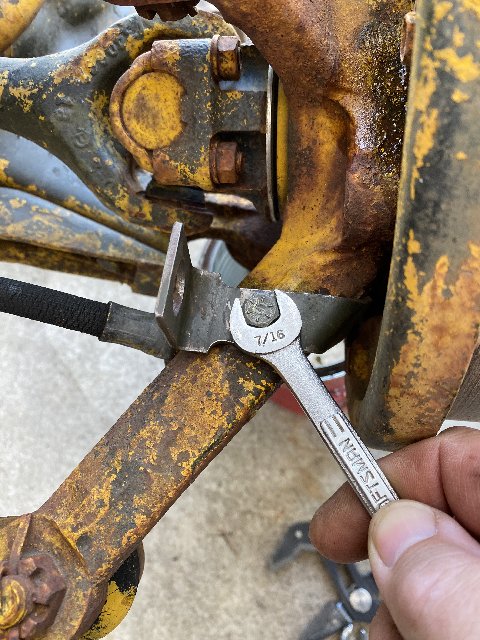
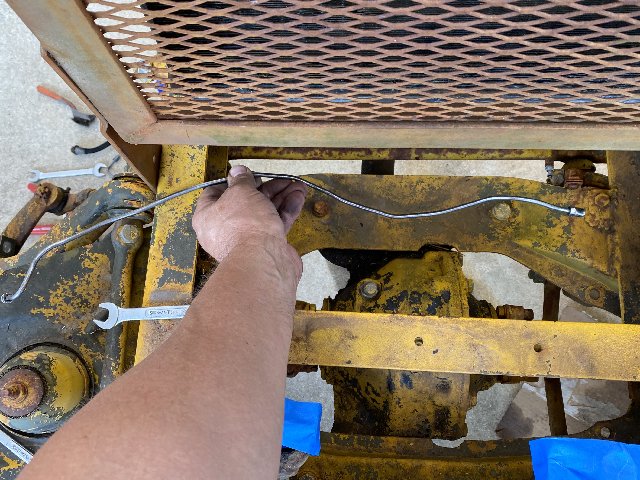
Loosening the hard line from the soft line - Leaving the retaining clip in place, use a 5/8" wrench on the soft line and a 3/8" line wrench on the hard line fitting. You've heard me say it before....you ain't no kind of mechanic if you don't have line wrenches in your toolbox.
My experience with old brake lines leaves me with two important nuggets of wisdom to share. Brake lines that resist coming loose are most often persuaded by a firm tug on the line wrench which is far better than simply increasing the pressure on the wrench. A momentary shock is, in my experience, far more productive. You're not there to negotiate. You're there to dominate. So, wrench like you mean it!
Also keep in mind that the line's nut fitting may not necessarily be resisting because it is stuck in the other half of the fitting. It is far more likely that it may actually be stuck against the line itself. So, like any mechanism that is being uncooperative, a little scraping or wire-brushing and a shot of PB Blaster where the line goes into the nut may make quite a bit of difference.

To release the hard line fitting from the wheel cylinder you'll need enough room to get a line wrench on it. From this photo, you may conclude that the bleeder is in the way and you'd be absolutely correct.
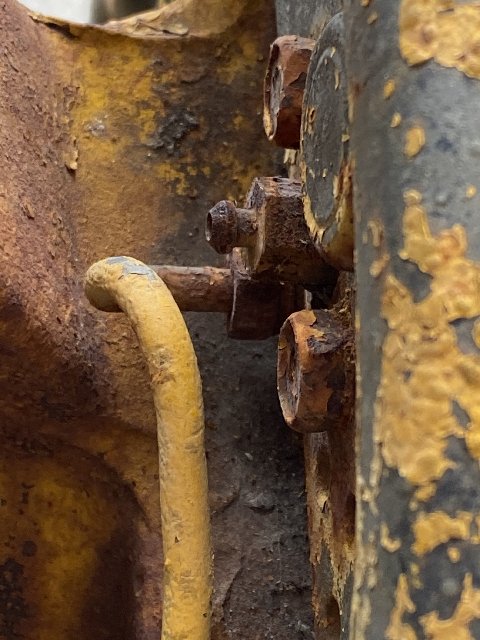
So, remove the bleeder entirely. It will appear as though there isn't enough room for it to come out but it will.

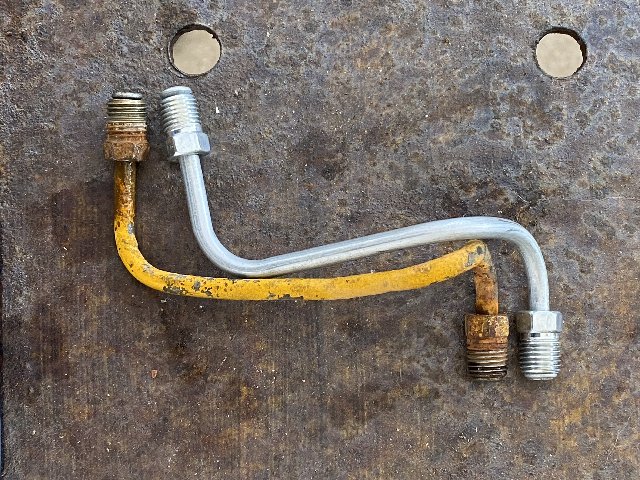
Here, we compare the new parts with the old. Very, very close.
I removed the soft line retaining bracket, cleaned it up a little bit and reinstalled it with blue Loctite on the threads. This will make things just a little bit easier when things come back together. These little jobs take up a lot of time but since we have nothing BUT time, it will be time well spent.
Judging by their thickness, these shoes are almost new! it must have been quite a disappointment for the last guy. All new brakes and 'no va'!
Hard lines that are removed get inspected, cleaned up inside and out, ensuring everything turns smoothly. There was still a little bit of DOT5 left in these so they're actually not too bad. This particular line is wrong...about 6" too long but a photographic record of where it was and how it was oriented will be helpful during reassembly. Left alone, these lines will probably rust badly on the outside, considering their age. So don't be too surprised if you see me paint them
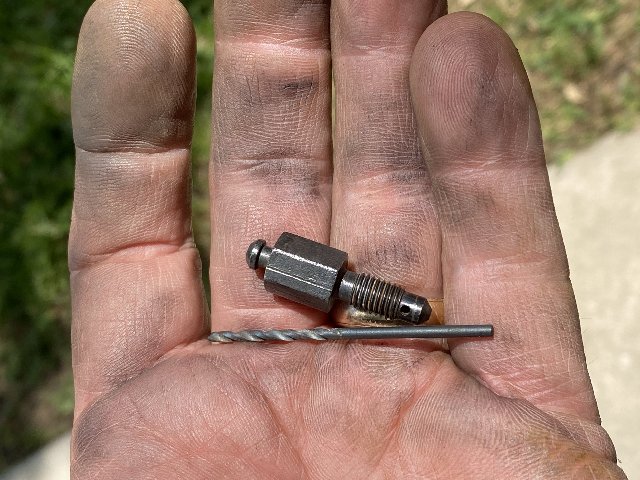
Bleeders are routinely found to be in very poor shape especially if they have been uncapped. With new wheel cylinders come new bleeders but, in the spirit of waste-not-want-not, I'll clean these up and they will become an offering to The Great Big Box of Everything.

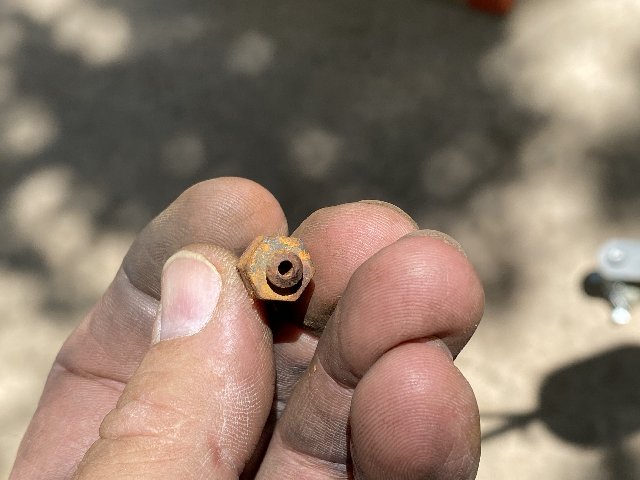
A 5/16" twist bit run by hand does wonders to open them up. Follow up with a little PB Blaster and another rodding out with the twist bit and things will work just as they should, provided the tip that mates to the seat in the bleeder is in good condition. The 5/64 will not fit in the hole in the side but a little piece of wire usually will and that's all you need.
Another photo for later reference. You may note that the bracket for the brake line 'T' is missing. In fact, this was wrenched off the bracket and the bracket badly bent. This has been floating around down there, unsupported, for a long, long time.
So, I remove the bracket, clean it up a little bit, straighten it out and re-swage the two back together.
THIS awful thing gave me a ton of grief...
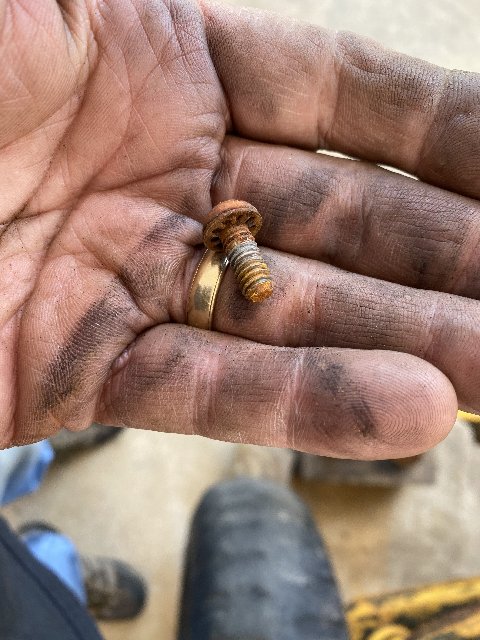
...and was replaced by this. Whoever decided it would be a good idea to use a standard machine screw to hold this bracket on should receive a very public flogging. It took two of us to get it off. One to work the wrench and another to work the screwdriver...with a wrench on it. All well and good when everything is new but not so good when everything is old and corroded. This short little hex cap screw is a far better option in my opinion and far fewer threads hanging out the other end to become corroded and troublesome at some later date.
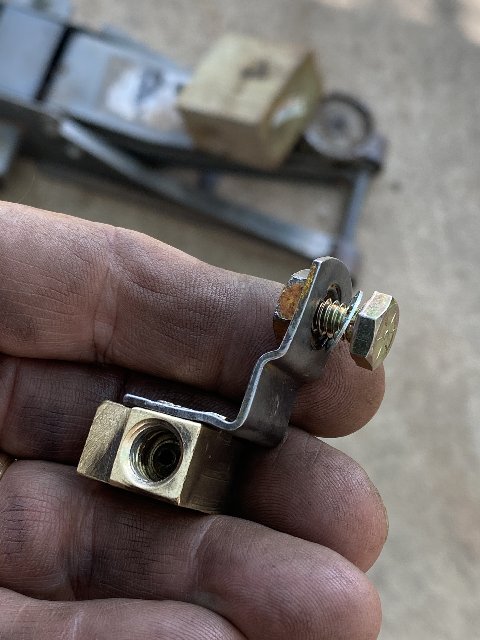
Made ready for service and back on the Doom Buggy, this time, with a far more sensible fastener.

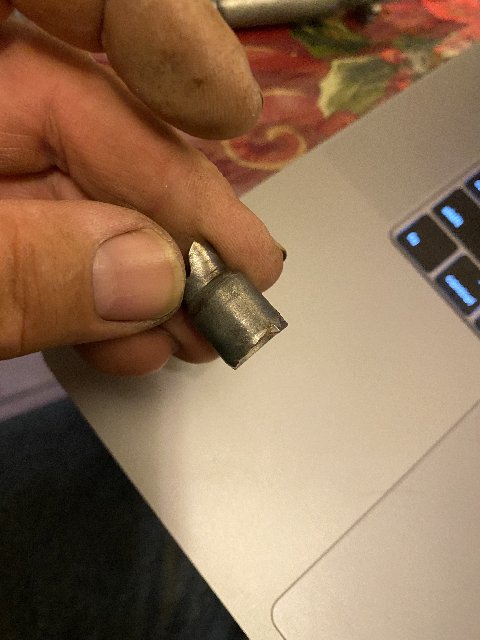
On the matter of soft, or flexible lines, don't throw the old ones away until you salvage the washer from each end. They are an absolute necessity.
These form the shoulder that goes against the bracket on one side (while the clip goes on the other side of the bracket). Maybe your new lines will come with them. Maybe they won't. As ugly as these look, they cleaned up beautifully.
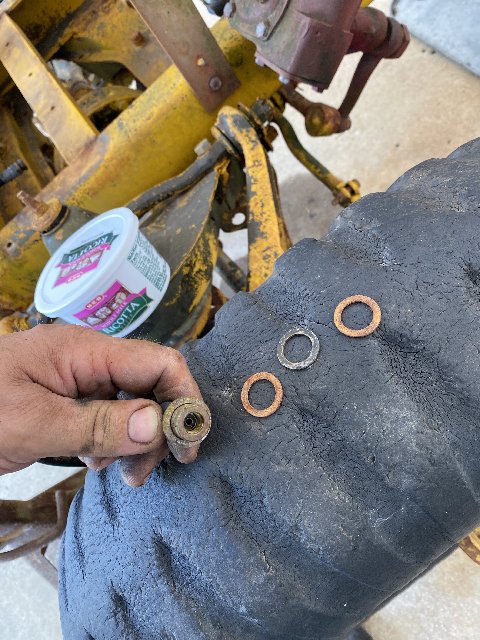
Just put your 5/8" wrench on the fitting behind the washer and tap the end of the line gently until they come off. They are a VERY precise fit. if you bend one, don't flatten it with a hammer because you'll never get it on another hose.

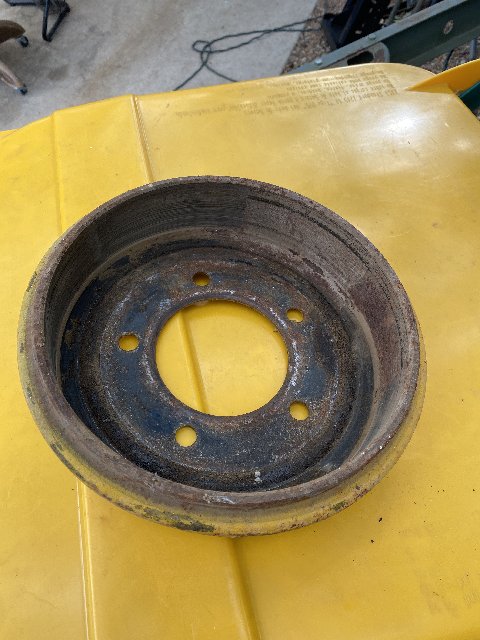
This brake drum, though filthy. actually looks to be in pretty good condition. I may have these turned ever so slightly just to ensure they're true.
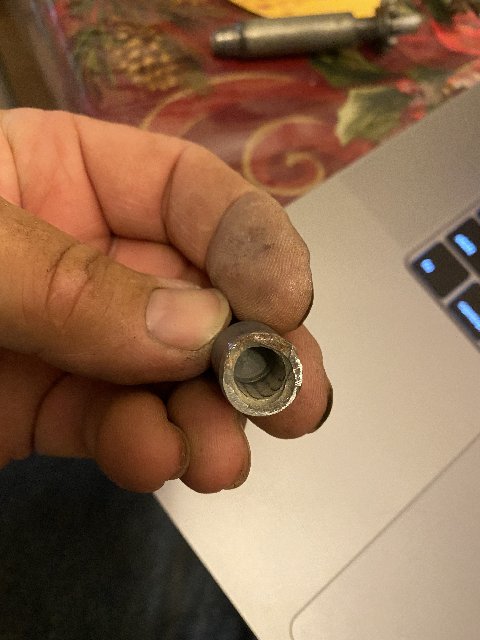
Well now...would you venture a guess as to what is going on inside this soft line?
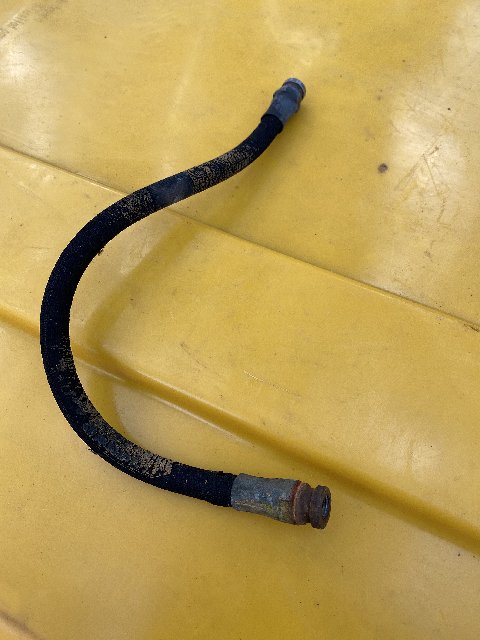


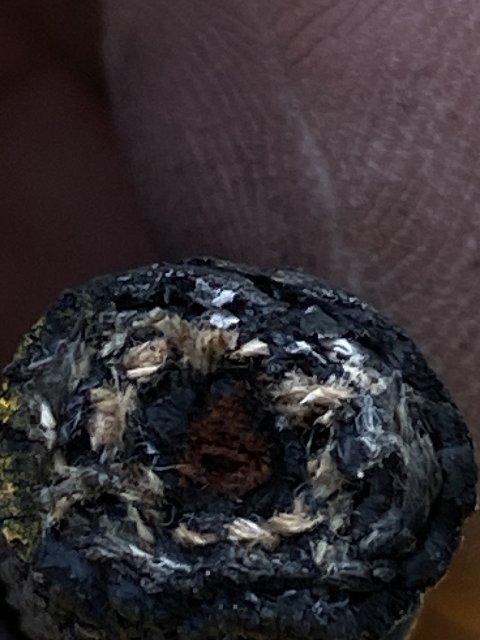
And yet, the hard lines up against these lines are generally free and clear. So, we may assume the degradation of this line took place pretty much after the previous owners stopped driving it.

Cheers,
TJ
Regarding the matter of selecting useful things from the pile of parts that was once the Alley Cat...
Another trans-brake lever (because I've discovered that the one on the Doom Buggy doesn't want to adjust) and at the moment, I have bigger fish to fry than to have to fool around with it...
And all these lovelies, all cleaned up and ready to go...
And a reasonably nice set of composite lights because this will have brake and turn lights for flat towing.
Now, I turn my attention to the long overdue matter of being able to stop or NOT being able to stop...depending upon your point of view.
BRAKES! Yes, brakes. The unsung heros of every motor vehicle. So let's have a look at the right front to get an idea of what we're going to need in parts.
Since ALL the wheels of the Doom Buggy are technically "front axles" whether they are on the front or the rear, we need to remember two things. Everything we need, parts-wise, relates to front axles with the notable exception of wheel cylinders which shall be sized and installed as required on any M151 - two 1" wheel cylinders for the fronts and two 3/4" wheel cylinders for the rears....because TJ likes to stop in a straight line whenever possible.
And isn't a spectacular treat to be able to get at and actually see everything?
And remember what we just said. The soft, or flexible brake line kit you'd normally buy for your normal M151 will not do for our needs.
in this application, we're going to need two sets of front soft lines.
The drum comes off with just a little resistance and a lot of West Texas acreage spills out...
And a little wildlife scrambles for cover...
It looks creepy in there, like Raiders of the Lost Ark...
If you have a good eye, you'll notice the front shoe (bottom) is sort of canted outward, ever so slightly.
Because something is missing...
And because the shoe is not being kept properly aligned it's rubbing against the inner face of the drum. Luckily, these wheels haven't been turning very much lately so no harm has been done.
Loosening the hard line from the soft line - Leaving the retaining clip in place, use a 5/8" wrench on the soft line and a 3/8" line wrench on the hard line fitting. You've heard me say it before....you ain't no kind of mechanic if you don't have line wrenches in your toolbox.
My experience with old brake lines leaves me with two important nuggets of wisdom to share. Brake lines that resist coming loose are most often persuaded by a firm tug on the line wrench which is far better than simply increasing the pressure on the wrench. A momentary shock is, in my experience, far more productive. You're not there to negotiate. You're there to dominate. So, wrench like you mean it!
Also keep in mind that the line's nut fitting may not necessarily be resisting because it is stuck in the other half of the fitting. It is far more likely that it may actually be stuck against the line itself. So, like any mechanism that is being uncooperative, a little scraping or wire-brushing and a shot of PB Blaster where the line goes into the nut may make quite a bit of difference.
To release the hard line fitting from the wheel cylinder you'll need enough room to get a line wrench on it. From this photo, you may conclude that the bleeder is in the way and you'd be absolutely correct.
So, remove the bleeder entirely. It will appear as though there isn't enough room for it to come out but it will.
Here, we compare the new parts with the old. Very, very close.
I removed the soft line retaining bracket, cleaned it up a little bit and reinstalled it with blue Loctite on the threads. This will make things just a little bit easier when things come back together. These little jobs take up a lot of time but since we have nothing BUT time, it will be time well spent.
Judging by their thickness, these shoes are almost new! it must have been quite a disappointment for the last guy. All new brakes and 'no va'!
Hard lines that are removed get inspected, cleaned up inside and out, ensuring everything turns smoothly. There was still a little bit of DOT5 left in these so they're actually not too bad. This particular line is wrong...about 6" too long but a photographic record of where it was and how it was oriented will be helpful during reassembly. Left alone, these lines will probably rust badly on the outside, considering their age. So don't be too surprised if you see me paint them
Bleeders are routinely found to be in very poor shape especially if they have been uncapped. With new wheel cylinders come new bleeders but, in the spirit of waste-not-want-not, I'll clean these up and they will become an offering to The Great Big Box of Everything.
A 5/16" twist bit run by hand does wonders to open them up. Follow up with a little PB Blaster and another rodding out with the twist bit and things will work just as they should, provided the tip that mates to the seat in the bleeder is in good condition. The 5/64 will not fit in the hole in the side but a little piece of wire usually will and that's all you need.
Another photo for later reference. You may note that the bracket for the brake line 'T' is missing. In fact, this was wrenched off the bracket and the bracket badly bent. This has been floating around down there, unsupported, for a long, long time.
So, I remove the bracket, clean it up a little bit, straighten it out and re-swage the two back together.
THIS awful thing gave me a ton of grief...
...and was replaced by this. Whoever decided it would be a good idea to use a standard machine screw to hold this bracket on should receive a very public flogging. It took two of us to get it off. One to work the wrench and another to work the screwdriver...with a wrench on it. All well and good when everything is new but not so good when everything is old and corroded. This short little hex cap screw is a far better option in my opinion and far fewer threads hanging out the other end to become corroded and troublesome at some later date.
Made ready for service and back on the Doom Buggy, this time, with a far more sensible fastener.
On the matter of soft, or flexible lines, don't throw the old ones away until you salvage the washer from each end. They are an absolute necessity.
These form the shoulder that goes against the bracket on one side (while the clip goes on the other side of the bracket). Maybe your new lines will come with them. Maybe they won't. As ugly as these look, they cleaned up beautifully.
Just put your 5/8" wrench on the fitting behind the washer and tap the end of the line gently until they come off. They are a VERY precise fit. if you bend one, don't flatten it with a hammer because you'll never get it on another hose.
This brake drum, though filthy. actually looks to be in pretty good condition. I may have these turned ever so slightly just to ensure they're true.
Well now...would you venture a guess as to what is going on inside this soft line?
And yet, the hard lines up against these lines are generally free and clear. So, we may assume the degradation of this line took place pretty much after the previous owners stopped driving it.
Cheers,
TJ
Re: Beverly Hillbillies
Sorry for the delay, guys. I know some of you are following this thread.
Alibis -
Parts are coming in in dribs and drabs
My back is killing me (a blown disc, maybe two) and the rum is gone (Why is the rum always gone?!)
The weather has been a little bit of everything and when it has been nice, I've been otherwise occupied (like cleaning out gutters between big rains)
I have been devoting some of my time helping some other folks with their MV projects (and yes, I should have taken pictures of that because your tongues would have been hanging out)
..and we have a new kitten who never seems to be where you'd expect her to be
So, don't go away. Hang in there and a we'll soon be back to wrenching on the Doom Buggy.
Cheers,
TJ
-
Hambone
- Brigadier General

- Posts: 2512
- Joined: October 1st, 2010, 12:19 am
- Location: El Dorado, Arkansas
Re: Beverly Hillbillies
TJ
What did you have to pay for the short front brake lines? last one I got from Red River were about $10 and he only has the left side.
What did you have to pay for the short front brake lines? last one I got from Red River were about $10 and he only has the left side.
Re: Beverly Hillbillies
I started today by removing the brake bits from the right front. You will remember that one of the retaining springs (that keeps the shoe aligned with the backing plate) had gone missing, along with the little spring anchor. So, when it came to removing things, I was left only with one out of two to deal with.
Since I have complete spring sets, the speediest method of removal was to destroy the retaining spring. This is achieved by grabbing the outermost turn of the spring and giving her a good yank. This essentially unwinds the larger turns of the spring, allowing it to be pushed through the brake shoe frame, toward the backing plate which, in turn, allows you to get at the anchor and remove it quite easily. Then it's a simple matter of pulling the spring back out.
Generally, I like to be a little more subtle with my work but smaller gauge springs do not fare well once they begin to rust and in the long run it is just better to replace them altogether. So these got the gorilla treatment. Doing it in this way also meant not having to man-handle the spring anchor in any way. It's important to preserve those because this rig is missing two and I have only four spares.

The designers got it right with the MUTT. Elegant in its simplicity. Very few parts and most parts are duplicative.
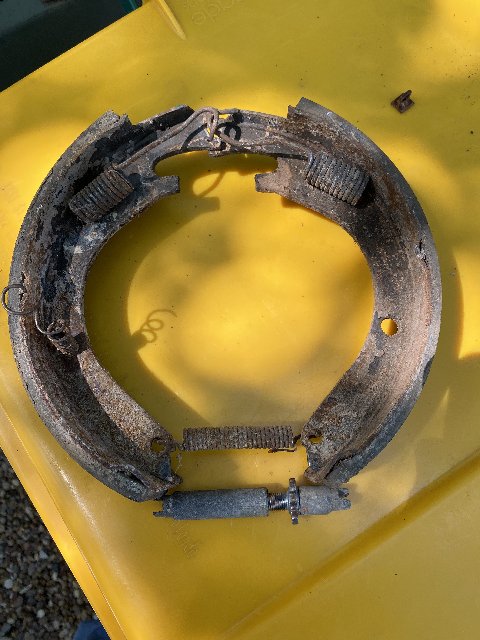
Most pieces I've removed get a good cleaning and a coat of paint, whether I intend to use them again immediately, or not.

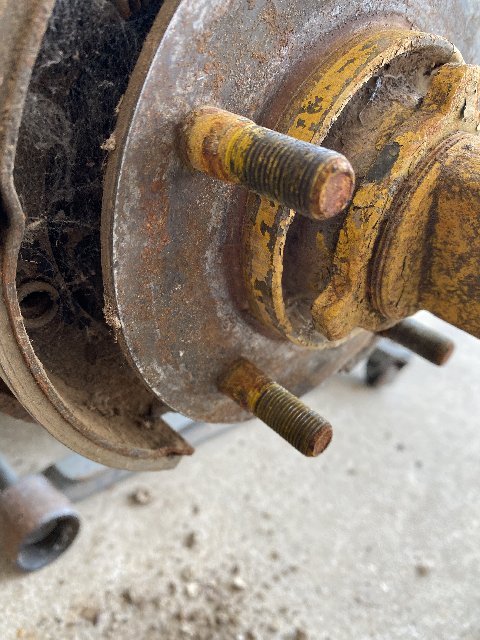
Wheel cylinders on these trucks are in close quarters. Getting them out can be tricky. The backs of the wheel studs can get in the way, making it necessary to rotate the hub to provide optimal clearance.
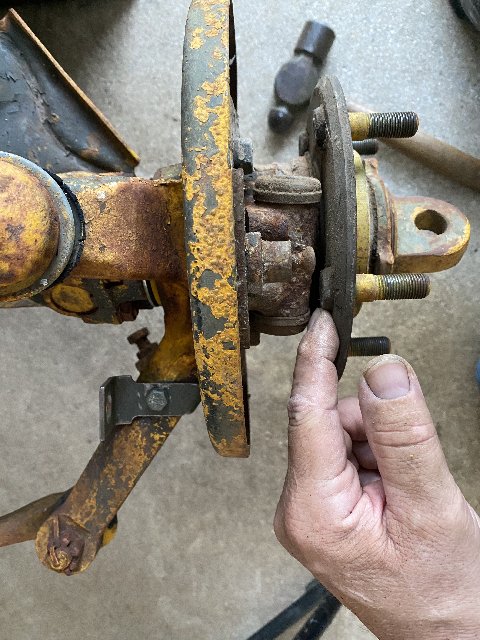
With the hub properly clocked, the wheel cylinder can come out.
It can be a little tricky, especially with a backing plate that is caked with all sorts of nasty stuff. But in this process, a little patience pays off.
For a moment it feels a bit ticklish...like Chinese puzzle you'll never solve and then, it comes out.
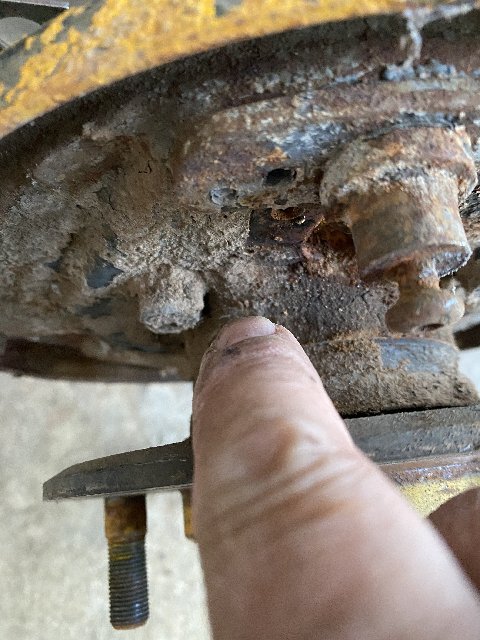
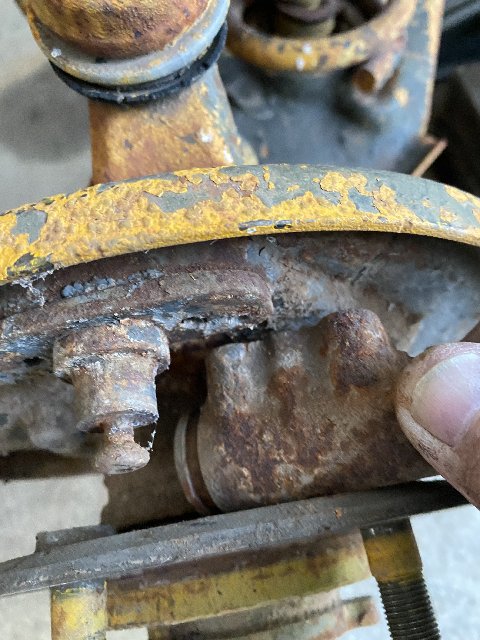
This is not healthy. How does damage like this happen?!!

Even the bottom edge is chewed.
Ok, so I find I'm going to be ordering some new adjusters. This ain't kosher. This puts me back a bit but give me additional time to clean up the backing plates, so all is well.
The wheel cylinders aren't too bad and the pistons moved freely (this had 3/4" diameters on the front) but, the rubber boots were badly decayed and the cup seals were only marginal. Not the kind of thing I want on my rig.
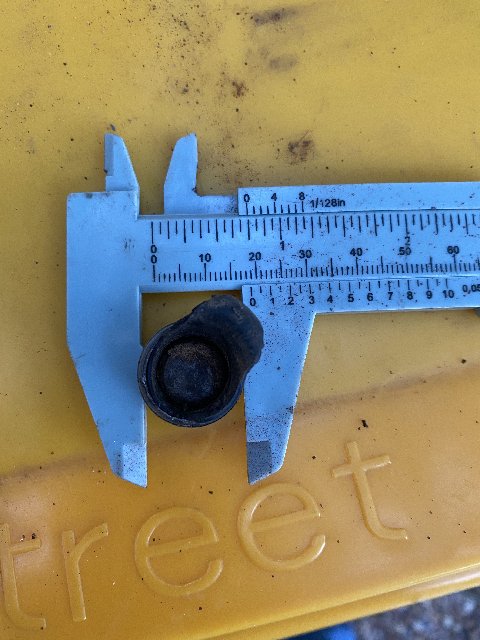
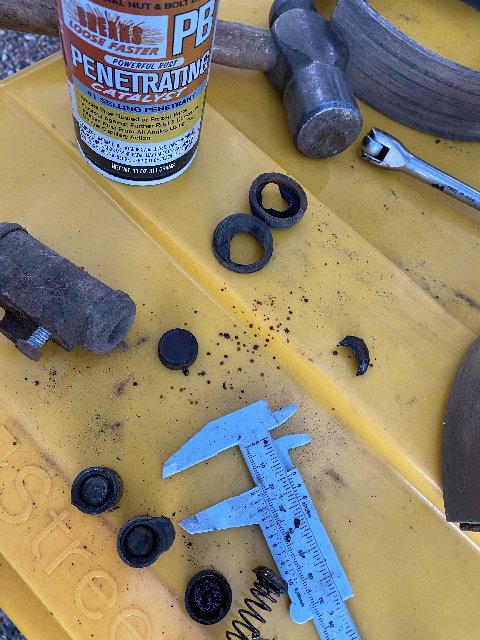
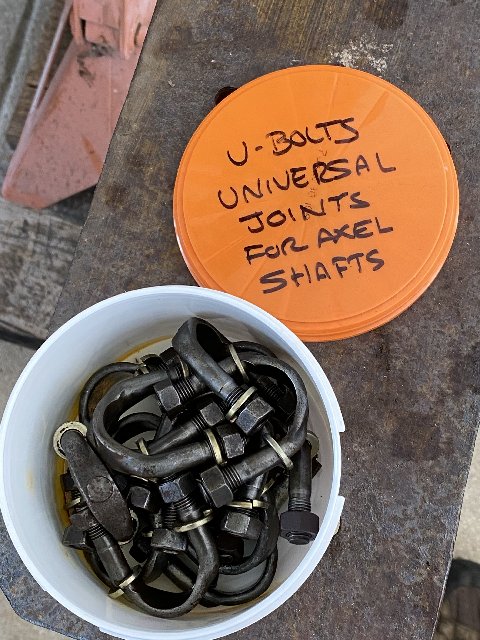
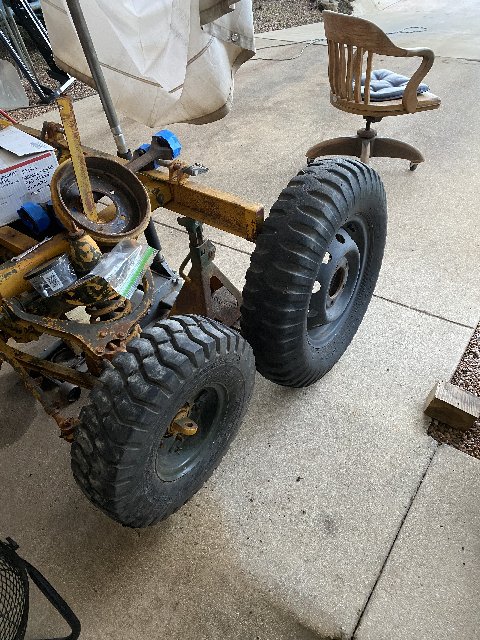
Bonus photos (since I made y'all wait). We delve into the world of the weird. Nothing says "OLD SCHOOL" like Big-n-Littles!

Too cool for school! (Small containers and baggies help keep me organized. They contain parts I've scheduled for each brake position.)
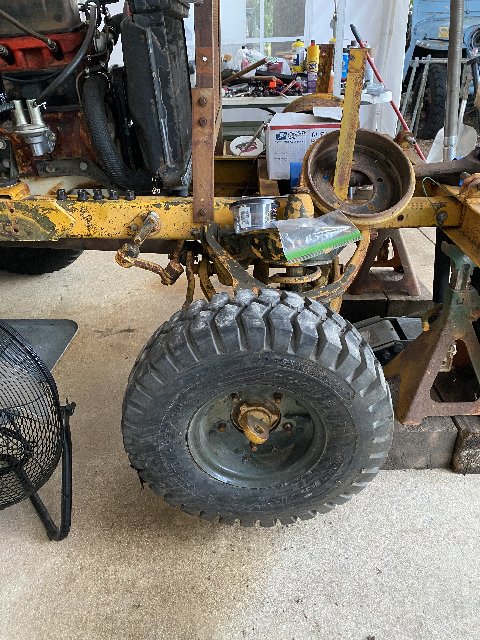
Now, before y'all get too excited, these don't really fit...which is to say, they would fit if the bolts holding the two-piece wheels together weren't in the way and even if you managed to eliminate those, the tiny wheel would never clear the brakes.
Still, it may be beneficial to know that the small industrial wheels such as are found on flight-line carts and such, do have a Ford lug pattern and a center hole that matches perfectly. Now you know!
Cheers,
TJ
Since I have complete spring sets, the speediest method of removal was to destroy the retaining spring. This is achieved by grabbing the outermost turn of the spring and giving her a good yank. This essentially unwinds the larger turns of the spring, allowing it to be pushed through the brake shoe frame, toward the backing plate which, in turn, allows you to get at the anchor and remove it quite easily. Then it's a simple matter of pulling the spring back out.
Generally, I like to be a little more subtle with my work but smaller gauge springs do not fare well once they begin to rust and in the long run it is just better to replace them altogether. So these got the gorilla treatment. Doing it in this way also meant not having to man-handle the spring anchor in any way. It's important to preserve those because this rig is missing two and I have only four spares.
The designers got it right with the MUTT. Elegant in its simplicity. Very few parts and most parts are duplicative.
Most pieces I've removed get a good cleaning and a coat of paint, whether I intend to use them again immediately, or not.
Wheel cylinders on these trucks are in close quarters. Getting them out can be tricky. The backs of the wheel studs can get in the way, making it necessary to rotate the hub to provide optimal clearance.
With the hub properly clocked, the wheel cylinder can come out.
It can be a little tricky, especially with a backing plate that is caked with all sorts of nasty stuff. But in this process, a little patience pays off.
For a moment it feels a bit ticklish...like Chinese puzzle you'll never solve and then, it comes out.
This is not healthy. How does damage like this happen?!!
Even the bottom edge is chewed.
Ok, so I find I'm going to be ordering some new adjusters. This ain't kosher. This puts me back a bit but give me additional time to clean up the backing plates, so all is well.
The wheel cylinders aren't too bad and the pistons moved freely (this had 3/4" diameters on the front) but, the rubber boots were badly decayed and the cup seals were only marginal. Not the kind of thing I want on my rig.
Bonus photos (since I made y'all wait). We delve into the world of the weird. Nothing says "OLD SCHOOL" like Big-n-Littles!
Too cool for school! (Small containers and baggies help keep me organized. They contain parts I've scheduled for each brake position.)
Now, before y'all get too excited, these don't really fit...which is to say, they would fit if the bolts holding the two-piece wheels together weren't in the way and even if you managed to eliminate those, the tiny wheel would never clear the brakes.
Still, it may be beneficial to know that the small industrial wheels such as are found on flight-line carts and such, do have a Ford lug pattern and a center hole that matches perfectly. Now you know!
Cheers,
TJ
Re: Beverly Hillbillies
Bucky sez, "I like the big-n-littles, Daddy-O!
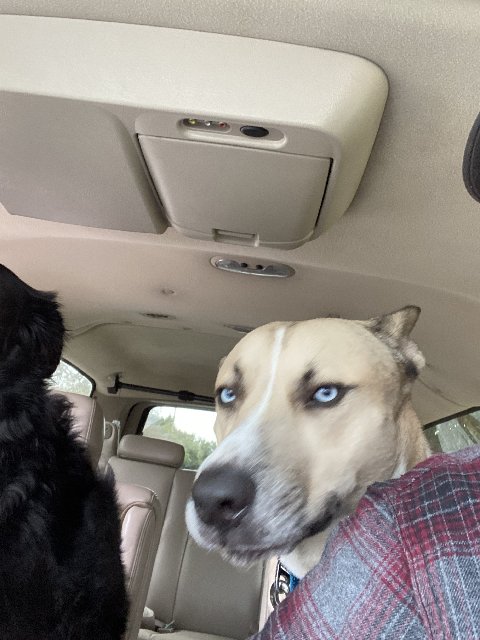
You're a sly dog, Bucky!
You're a sly dog, Bucky!


Re: Beverly Hillbillies
I just noticed, he has Husky eyes!
1964 M151A1
1984 M1008
1967 M416
04/1952 M100
12/1952 M100- Departed
AN/TSQ-114A Trailblazer- Gone
1984 M1008
1967 M416
04/1952 M100
12/1952 M100- Departed
AN/TSQ-114A Trailblazer- Gone

Re: Beverly Hillbillies
Just in case... https://www.oreillyauto.com/detail/b/br ... 7037&pos=0
Couple bucks cheaper at rockauto not including shipping if you don't have the O nearby.
Couple bucks cheaper at rockauto not including shipping if you don't have the O nearby.
1960 M151 Run #1
"There is one nut on a M151 that is very difficult to remove....." - K8icu
"She ain't a Cadillac and she ain't a Rolls, But there ain't nothin' wrong with the radio" - Aaron Tippin

"There is one nut on a M151 that is very difficult to remove....." - K8icu
"She ain't a Cadillac and she ain't a Rolls, But there ain't nothin' wrong with the radio" - Aaron Tippin
Re: Beverly Hillbillies
Yup, those are really, really close kits. The bottom spring isn't quite it but the long springs and anchors and brake shoe guide springs certainly are.
Re: Beverly Hillbillies
YUP, Bucky is part Husky. Once you get past the boundless energy (and a tendency to escape over, under, around, or between) he's a very fine fellow....loves the new kitten and a good scratch between the ears.
So, I took some days away from the project. My back was hurting pretty badly so I combined alcohol, sleep, and a heating pad into something that passed for relief. I'm past that time in my life where I think 'pushing through' seems like a better option. So, I'm just kind of coasting.
Today, despite the heat we are experiencing, I paid a visit to the Doom Buggy and started in on a cleanup of the brake baking plates. The work went well with a small wire brush, a flathead screwdriver and a small metal spatula.
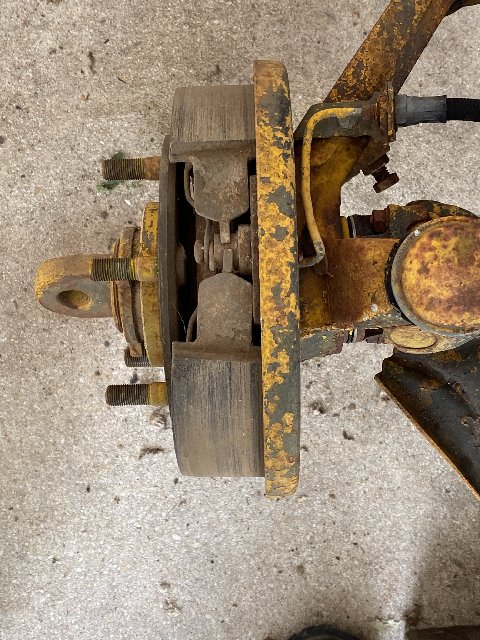
The photo that follows is the right front. Click on the photos and they will expand and straighten up.
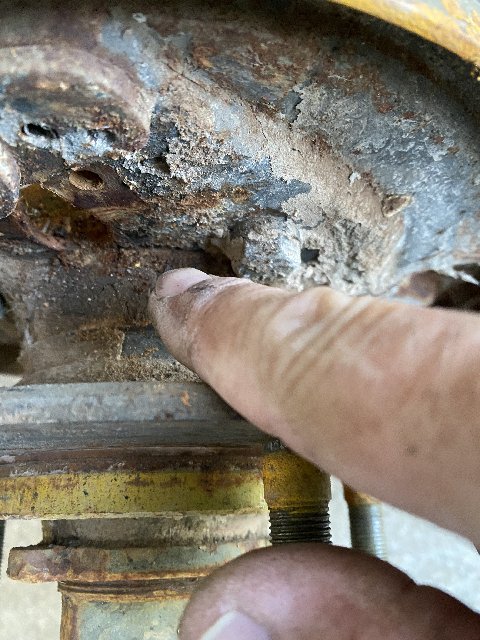
Note the new-looking outer grease seal retaining ring. Someone has been in here before me!
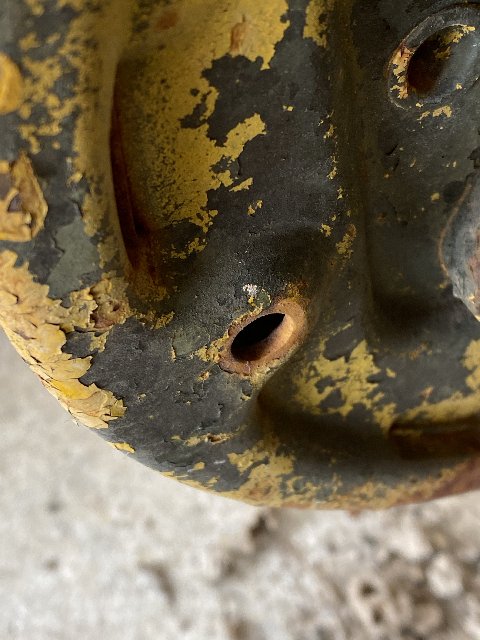
But some damage to the brake baking plate indicates this wheel had a bearing that went bad at some point where the drum "modified" the edges of the plate for a short while which probably accounts for the newish seal-kit. Must have made quite a noise rearranging the lip of that backing plate! An interior lip was created on the edge of the plate on the lower edge. That lip doesn't belong there.
An exterior lip was created on the edge of the plate on the aft edge.
So, I will attempt to remove the inner lip with a stone chucked up in a drill. The edge of the drum (which rides inside the edge of the backing plate) does clear it at this time but I'm in here already and in the long run, it will benefit from getting tidied up. I'll even dress up the outer lip. This is not uncommon damage to find and as I said, all evidence points to the drum clearing the backing plate fully at this time. Mostly, I want to assist whatever gets IN the brakes, to get OUT again. So the lip cannot remain there.
Did I mention that it is HOT?
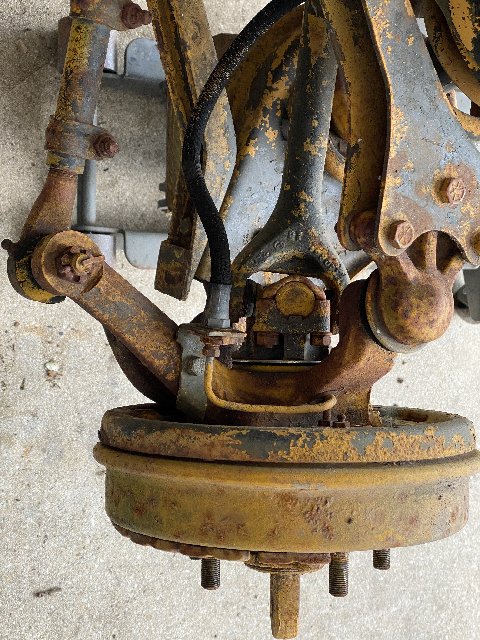
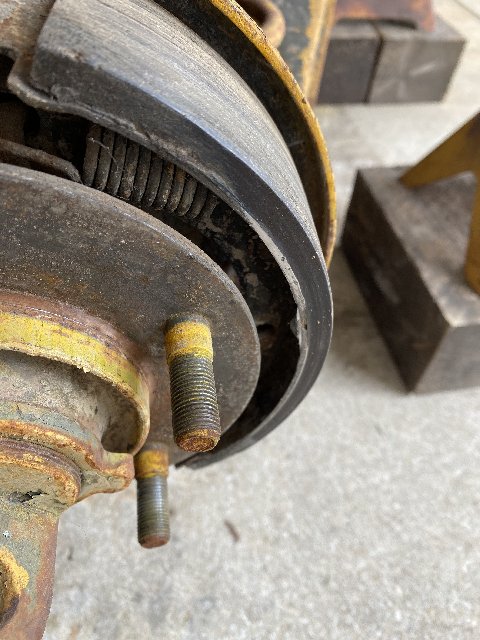
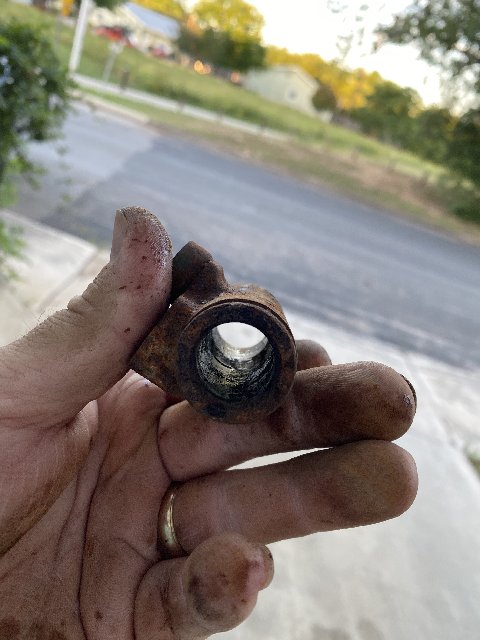
Next is the left front. Here, we see evidence of the outer grease seal leaking...not a monstrous amount but detectable. I'm still toying with the idea of tearing into this one (since it is the oldest of the two) and inspecting the bearings just to satisfy myself that all is well. To that end, I have already removed the grease cap.
I have inserted a screwdriver to show where the grease migrates onto the hub drive flange. Centrifugal force then runs it outward.
Considering that I will be removing the axle shafts for servicing, at that point I will be one cotter pin, one nut and one washer away from being able to pull the whole thing apart to have a look inside and (lucky me) I believe The Great Big Box of Everything has at least one seal kit floating around in there.
Cheers,
TJ
So, I took some days away from the project. My back was hurting pretty badly so I combined alcohol, sleep, and a heating pad into something that passed for relief. I'm past that time in my life where I think 'pushing through' seems like a better option. So, I'm just kind of coasting.
Today, despite the heat we are experiencing, I paid a visit to the Doom Buggy and started in on a cleanup of the brake baking plates. The work went well with a small wire brush, a flathead screwdriver and a small metal spatula.
The photo that follows is the right front. Click on the photos and they will expand and straighten up.
Note the new-looking outer grease seal retaining ring. Someone has been in here before me!
But some damage to the brake baking plate indicates this wheel had a bearing that went bad at some point where the drum "modified" the edges of the plate for a short while which probably accounts for the newish seal-kit. Must have made quite a noise rearranging the lip of that backing plate! An interior lip was created on the edge of the plate on the lower edge. That lip doesn't belong there.
An exterior lip was created on the edge of the plate on the aft edge.
So, I will attempt to remove the inner lip with a stone chucked up in a drill. The edge of the drum (which rides inside the edge of the backing plate) does clear it at this time but I'm in here already and in the long run, it will benefit from getting tidied up. I'll even dress up the outer lip. This is not uncommon damage to find and as I said, all evidence points to the drum clearing the backing plate fully at this time. Mostly, I want to assist whatever gets IN the brakes, to get OUT again. So the lip cannot remain there.
Did I mention that it is HOT?
Next is the left front. Here, we see evidence of the outer grease seal leaking...not a monstrous amount but detectable. I'm still toying with the idea of tearing into this one (since it is the oldest of the two) and inspecting the bearings just to satisfy myself that all is well. To that end, I have already removed the grease cap.
I have inserted a screwdriver to show where the grease migrates onto the hub drive flange. Centrifugal force then runs it outward.
Considering that I will be removing the axle shafts for servicing, at that point I will be one cotter pin, one nut and one washer away from being able to pull the whole thing apart to have a look inside and (lucky me) I believe The Great Big Box of Everything has at least one seal kit floating around in there.
Cheers,
TJ
You do not have the required permissions to view the files attached to this post.
Re: Beverly Hillbillies
After a little break I decided there was enough time and light to go back out and take that lip off. The stone did its job and a flap disc trued up the outer edge. Here, we see that the edge was actually folded over. Thinned out enough with the stone, it came off as a thin ribbon of metal. I also finished the inner edge with the flap disc so that it is no longer razor sharp. Our backing plate has been restored to its former glory. Grit, brake dust and water are now free to run out the bottom, unobstructed.
Cheers,
TJ
Cheers,
TJ
You do not have the required permissions to view the files attached to this post.
Re: Beverly Hillbillies
(click on photos to enlarge)
I decided to see how well the old brake shoes would clean up because I am quickly approaching the moment when it's time to put this front end back together.
They are still in fairly good shape although the one that was missing it's spring anchor did wear somewhat unevenly. Still, I think it worthy of saving and perhaps, even reusing on this project. If I reuse it, it will wear more quickly than the other shoe until it is worn flat again but this vehicle is hardly what anyone would call a daily driver so I don't really see any downside to it.
So, I got out the drill and the cupped wire wheel and gave her a good cleanup, and then a final bath. If you do this, keep in mind, any wire wheel will throw particulates into the air; stuff that you might not want to breath in.
This particular shoe is the one that was wearing against the interior of the brake drum. As we can see, there is a high point now. Properly installed that shouldn't be a huge problem because that is the original height but let's take it down to the point where it is flush with the rest of the brake shoe frame. It'll look a little more professional.
With that high point ground off, a touch of paint and with a proper spring to keep it aligned when it is installed, I think we might just be able to go ahead and reuse this shoe without any dramas.
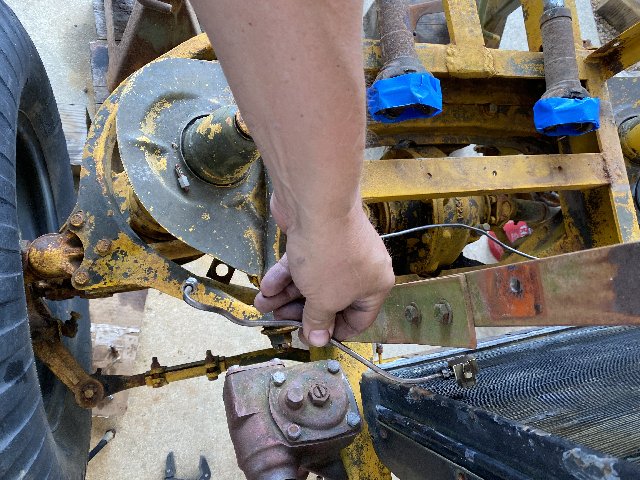
On the matter of installing and removing the conical springs (those little guys that keep the brake shoes aligned with the backing plate), if you've been following along, you know that I manhandled my old springs when I removed them, not caring in the least that they were useless when I was done. I ruined them on removal because they were very rusty and small gauge springs that are rusty are, in my opinion, wholly compromised.
But let us suppose for a moment that you have springs that you want (or must) reuse. Maybe you're making a trailside repair or you're working on a Sunday because you want to drive it on a Monday. How best to keep those springs intact? Well, that spring has to be elongated in order to remove or install the spring anchor, right? When dealing with a spring that is installed, we must be able to push it to extend it, rather than pull it... because when it is installed, it is nearly inaccessible.
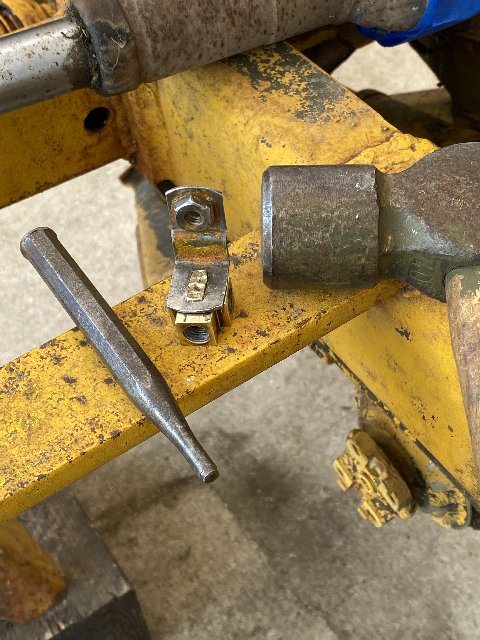
A commonly available tool you could use is a 3/16" pin punch....even a bent one like mine. Insert the punch into the brake shoe retaining spring and push firmly toward the backing plate. This will extend the spring through the backing plate, making it a simple matter to remove, or install the spring anchor.
Cheers,
TJ
I decided to see how well the old brake shoes would clean up because I am quickly approaching the moment when it's time to put this front end back together.
They are still in fairly good shape although the one that was missing it's spring anchor did wear somewhat unevenly. Still, I think it worthy of saving and perhaps, even reusing on this project. If I reuse it, it will wear more quickly than the other shoe until it is worn flat again but this vehicle is hardly what anyone would call a daily driver so I don't really see any downside to it.
So, I got out the drill and the cupped wire wheel and gave her a good cleanup, and then a final bath. If you do this, keep in mind, any wire wheel will throw particulates into the air; stuff that you might not want to breath in.
This particular shoe is the one that was wearing against the interior of the brake drum. As we can see, there is a high point now. Properly installed that shouldn't be a huge problem because that is the original height but let's take it down to the point where it is flush with the rest of the brake shoe frame. It'll look a little more professional.
With that high point ground off, a touch of paint and with a proper spring to keep it aligned when it is installed, I think we might just be able to go ahead and reuse this shoe without any dramas.
On the matter of installing and removing the conical springs (those little guys that keep the brake shoes aligned with the backing plate), if you've been following along, you know that I manhandled my old springs when I removed them, not caring in the least that they were useless when I was done. I ruined them on removal because they were very rusty and small gauge springs that are rusty are, in my opinion, wholly compromised.
But let us suppose for a moment that you have springs that you want (or must) reuse. Maybe you're making a trailside repair or you're working on a Sunday because you want to drive it on a Monday. How best to keep those springs intact? Well, that spring has to be elongated in order to remove or install the spring anchor, right? When dealing with a spring that is installed, we must be able to push it to extend it, rather than pull it... because when it is installed, it is nearly inaccessible.
A commonly available tool you could use is a 3/16" pin punch....even a bent one like mine. Insert the punch into the brake shoe retaining spring and push firmly toward the backing plate. This will extend the spring through the backing plate, making it a simple matter to remove, or install the spring anchor.
Cheers,
TJ
You do not have the required permissions to view the files attached to this post.