A place to post pics and descriptions of ongoing restoration projects
Moderators: rickf, raymond, Mr. Recovery
-
Francis Marion
- 2nd Lieutenant

- Posts: 877
- Joined: June 22nd, 2009, 2:29 pm
- Location: Taylorsville, UT
-
Contact:
Unread post
by Francis Marion » March 1st, 2013, 5:36 pm
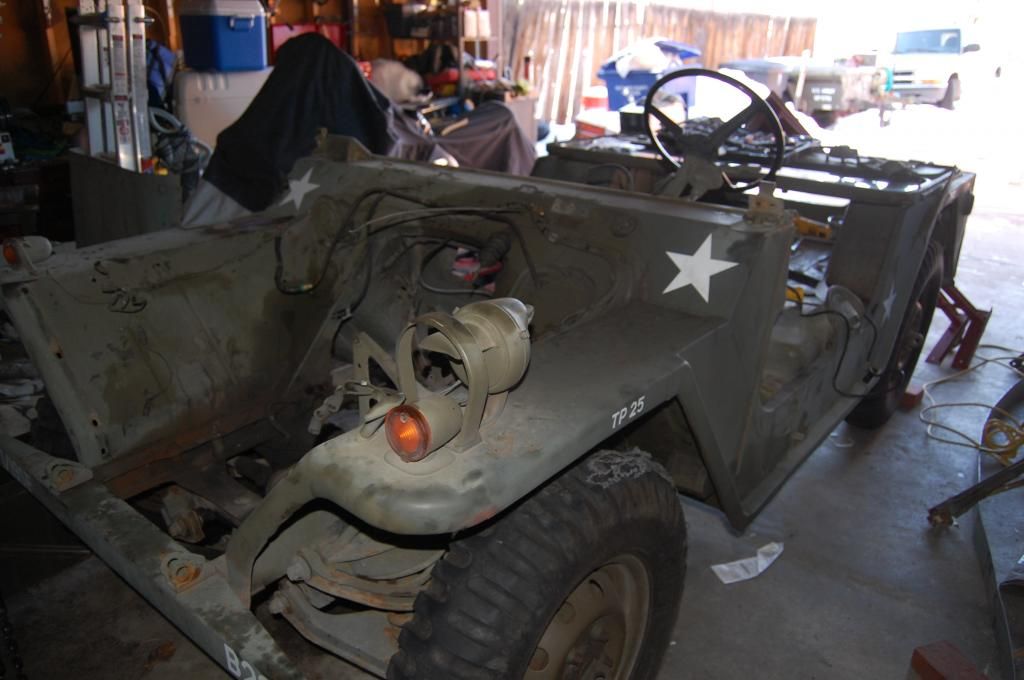
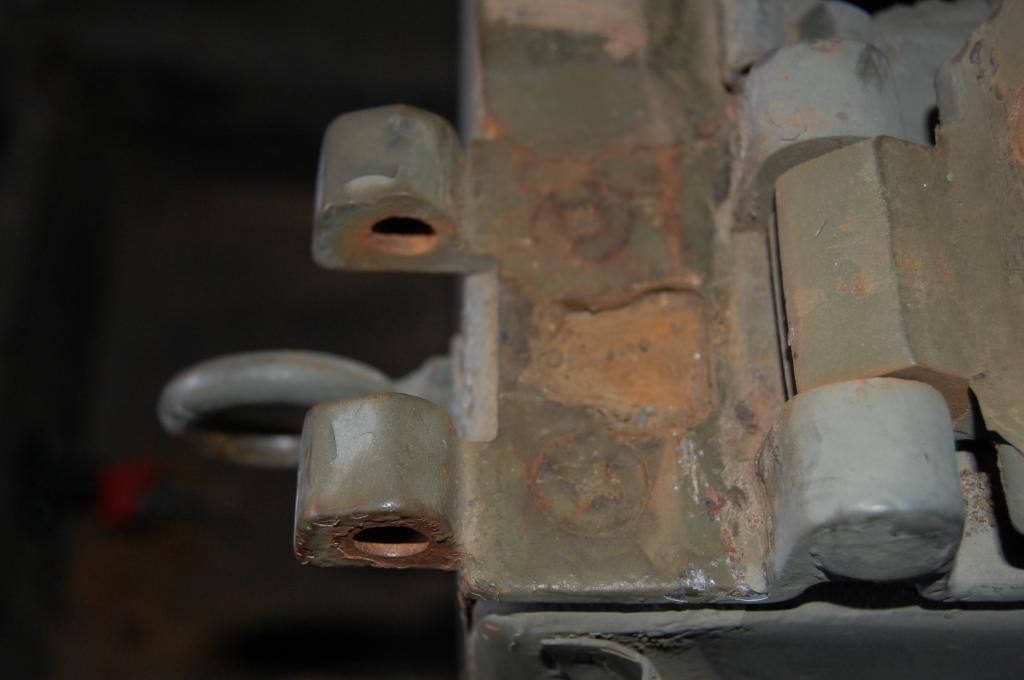
Look what fell out.
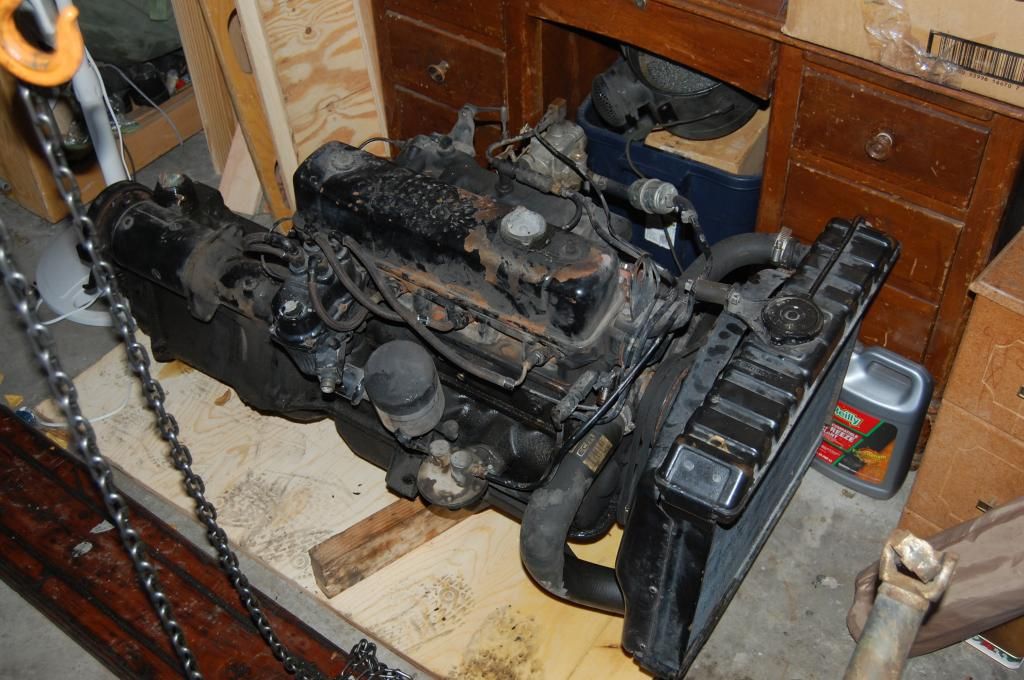
I have committed to the restoration and the disassembly has begun.
I have already encountered my first obstacle. Do I have any options for removing these screws that doesn't require a drill?
1968 M151A1
1967 M416
-
rickf
- General

- Posts: 19762
- Joined: November 26th, 2007, 1:28 pm
- Location: Pemberton, NJ.
Unread post
by rickf » March 1st, 2013, 7:14 pm
Those screws go into cage nuts under the dash. Spray the hell out of them with your favorite penetrant. Then an impact driver might break them loose. Try to clean out the screw slots as best you can with a sharp pick so the driver fits good and tight. It is a number 3 phillips. There are two more screws under the windshield, you will see them when you fold it down or better yet, remove it.IF you cab get them to move even a little then start working them in and out. It is going to take a lot of patience but it will pay off if you save the cage nuts. If you spin the nut in the cage it becomes a nightmare after that. If you go back to the Rick's restore posts you might see that part out of the vehicle.
Rick
1964 M151A1
1984 M1008
1967 M416
04/1952 M100
12/1952 M100- Departed
AN/TSQ-114A Trailblazer- Gone
-
67mutt
- Sergeant First Class

- Posts: 238
- Joined: December 21st, 2009, 7:44 pm
- Location: Clermont Co. Ohio
Unread post
by 67mutt » March 1st, 2013, 10:56 pm
Been there, Done that. I wish you well. Mine spun the cage nuts on both sides. I had to drill them. The drivers side wasn't too bad. The other side,,,,, it has a heater.


I still haven't done the windshield half. It's getting a new cowl seal this summer. Fun, fun, fun! (Just kidding, I love working on it.)
-
salt6
- 2nd Lieutenant
- Posts: 820
- Joined: April 6th, 2008, 12:18 am
- Location: NE Okla
-
Contact:
Unread post
by salt6 » March 1st, 2013, 11:21 pm
I used this to get a bolt out of the front a frame.
http://crcindustries.com/auto/automotive-products

"People sleep peaceably in their beds at night only because rough men stand ready to do violence on their behalf."
George Orwell
-------------------------------------
"I once was one of those men."
salt6
http://www.mg42.us
-
rickf
- General
- Posts: 19762
- Joined: November 26th, 2007, 1:28 pm
- Location: Pemberton, NJ.
Unread post
by rickf » March 2nd, 2013, 9:16 am
I can tell you a trick that has a very high rate of success but also require a high amount of patience and self control. It cannot be rushed. It also requires an oxy-acetylene torch because you need high heat in a small area fast. You cannot get that from a propane torch. What you need is to heat just the screw to close to red hot keeping in mind that the edges are tapered and thin. You are not worried about the edges. You want heat to go down the shaft of the screw fast before the nut heats up. This should only take 30 seconds at the most and then take the heat off and walk away.Come back in an hour or more and do it gain. Do this at least four or five times. Once it is cooled the last time or even when it is cool enough to touch then spray liberally with WD-40 or similar and wait for it to cool the rest of the way , basically you will be blowing a whole day. That is why I said it take a high amount of self control and cannot be rushed. OK, Here is the theory behind what you are doing so it will make sense. We all know heat make metal expand and we also know that heat breaks rust free. The rust breaking is from the expansion. This method uses the expansion of the bolt to stretch the nut a hair oversize so as to loosen things up. That is why I say you want to heat JUST the bolt without heating the nut. That is why you have to heat the bolt fast before the heat can transfer through the threads to the nut.
NOW you are ready to remove the screw! But wait! There is one more trick you can employ to maximize you chances. Take some valve grinding compound and put it on the screwdriver tip and that will help prevent the tip from camming out of the screw. If none of this works then the last thing to try before getting otu the drill is to heat up the screw again but do not get it red hot, just hot. Remember what I said before, the nuts are just floating in a sheet metal cage which is probably rusted so you want to be as gentle as possible. Once it starts to move then back and forth and spray until it comes out.
Good luck
Rick
1964 M151A1
1984 M1008
1967 M416
04/1952 M100
12/1952 M100- Departed
AN/TSQ-114A Trailblazer- Gone
-
Cobra5
- Colonel

- Posts: 1528
- Joined: December 5th, 2007, 11:10 pm
- Location: Stevensville, Montana
Unread post
by Cobra5 » March 4th, 2013, 2:13 pm
Rick,
Couldn't one use a propane torch on the nut itself? The nut being a smaller area the propane torch should get it hot enough to expand the nut. Just thinking for those folks that don't have a torch setup. Also if this doesn't work, I'd recccomend using an easy out first before drilling it out.
Tim
-
rickf
- General
- Posts: 19762
- Joined: November 26th, 2007, 1:28 pm
- Location: Pemberton, NJ.
Unread post
by rickf » March 4th, 2013, 6:28 pm
Propane torch will not work here because of the sheet metal cage, you will destroy the cage before heating the nut. Propane torches, at least the handheld ones, do not generally put out a hot enough concentrated flame, It will work sometimes but not on the really bad ones. If you have access to the nut then yes it is best to heat the nut but we are talking about blind fasteners here where you do not have access to the backside for one reason or another. In either case you have to heat the nut OR the bolt faster than the other part can catch up to have the desired effect. You usually cannot get that from a propane torch. You CAN get it from a plumbers acetylene torch.
Rick
1964 M151A1
1984 M1008
1967 M416
04/1952 M100
12/1952 M100- Departed
AN/TSQ-114A Trailblazer- Gone
-
Fil Bonica
- Brigadier General

- Posts: 2607
- Joined: December 9th, 2007, 10:49 am
- Location: ~ Heaven ~
Unread post
by Fil Bonica » March 4th, 2013, 9:50 pm
Another possibility,
Leave it alone and work around it!
A2s thankfully have plain nuts instead of cage nuts
Fil Bonica
K1ABW
-
Cobra5
- Colonel
- Posts: 1528
- Joined: December 5th, 2007, 11:10 pm
- Location: Stevensville, Montana
Unread post
by Cobra5 » March 5th, 2013, 10:01 am
Fil Bonica wrote: A2s thankfully have plain nuts instead of cage nuts Fil Bonica
I understand now but, why not just save the hassle and get rid of the caged nuts altogether and replace them with standard nuts? I'll probably go this route when I start up again on the A-1.
-
rickf
- General
- Posts: 19762
- Joined: November 26th, 2007, 1:28 pm
- Location: Pemberton, NJ.
Unread post
by rickf » March 5th, 2013, 1:29 pm
The cage nuts made it easier and quicker to line up the screws during assembly and it also gives a bit of adjustment. You can go with welded, just make sure of your position before welding the nuts. They are going to be tough to weld in place unless you have that reinforcement out.
1964 M151A1
1984 M1008
1967 M416
04/1952 M100
12/1952 M100- Departed
AN/TSQ-114A Trailblazer- Gone
-
salt6
- 2nd Lieutenant
- Posts: 820
- Joined: April 6th, 2008, 12:18 am
- Location: NE Okla
-
Contact:
Unread post
by salt6 » March 5th, 2013, 2:00 pm
Use a MAP gas torch.
Sent from my iPhone using Tapatalk.
"People sleep peaceably in their beds at night only because rough men stand ready to do violence on their behalf."
George Orwell
-------------------------------------
"I once was one of those men."
salt6
http://www.mg42.us
-
Francis Marion
- 2nd Lieutenant
- Posts: 877
- Joined: June 22nd, 2009, 2:29 pm
- Location: Taylorsville, UT
-
Contact:
Unread post
by Francis Marion » March 7th, 2013, 9:49 pm
Just a quick update.
I've been under the weather the past week so little progress. A broken torsion spring on the garage door didn't help much either. I got the bolts out of the right side (the one pictured) by carefully picking out the rust and dirt build-up and then taping the hinge carefully with a Seabee tool. That broke the rust between the bolts and hinge. Careful use of a #3 philips and wrench combination broke the hold on the nuts and they came right out. The same process did not work for the left side hinge; looks like I'll be investing in a plumbers acetylene torch.
Of course I had to remove the (%*&@#$) heater and all other dash gauges and controls in the process.
I'm in no hurry so this may be a long thread.
1968 M151A1
1967 M416
-
rickf
- General
- Posts: 19762
- Joined: November 26th, 2007, 1:28 pm
- Location: Pemberton, NJ.
Unread post
by rickf » March 7th, 2013, 9:56 pm
You could try a MAPP torch as Salt said, they are hotter than a propane torch but not as hot as an acetylene torch. I was going to mention an impact driver for breaking the screws loose but if they do not break completely loose on the first or second try then you will break the cages. You have no "feel" with an impact.
1964 M151A1
1984 M1008
1967 M416
04/1952 M100
12/1952 M100- Departed
AN/TSQ-114A Trailblazer- Gone
-
Francis Marion
- 2nd Lieutenant
- Posts: 877
- Joined: June 22nd, 2009, 2:29 pm
- Location: Taylorsville, UT
-
Contact:
Unread post
by Francis Marion » March 14th, 2013, 1:19 pm
What's the best way to empty my fuel tank?
1968 M151A1
1967 M416
-
fowlercal
- Master Sergeant

- Posts: 302
- Joined: November 25th, 2008, 10:54 pm
- Location: San Antonio, Texas
Unread post
by fowlercal » March 14th, 2013, 1:48 pm
F.M.
There should be a drain plug on the bottom of the tank that exits through a hole in the floorboard below the tank. Remove it and drain the fuel.
