Beverly Hillbillies

Vehicles and items that do not fall into the general M151 categories

Moderators: rickf, raymond, Mr. Recovery

Post Reply
User avatar
m3a1
Lt. General
Lt. General
Posts: 4044
Joined: August 7th, 2014, 6:36 pm

Re: Beverly Hillbillies

Unread post by m3a1 » August 12th, 2020, 10:40 am

Life is a crapshoot. As my father was fond of saying, "You roll them bones and take your chances." I'll tell you what. I've put all this insanity in the rear view mirror. People are behaving like nuts lately and I'm not their therapist. All I can do is live my life and try to set a good example and circulate among like-minded people. I'm gonna have my fun until my train goes off the tracks once and for all. The rest of them? Well, they're going to have to figure that out for themselves.

Maybe today I'll go up to the Black Rifle Coffee Co. (which is a wonderful marketing concept considering their rather 'questionable' coffee). If' I park Dirty Gertie out front, I'm rather sure they'd appreciate the visit. :D

Cheers,
TJ

User avatar
m3a1
Lt. General
Lt. General
Posts: 4044
Joined: August 7th, 2014, 6:36 pm

Re: Beverly Hillbillies

Unread post by m3a1 » August 14th, 2020, 12:57 pm

Today will be the first step to refinish my pioneer kit tools to some level of presentability so that they can go on the Gama Goat. They have been sitting in the M109's pioneer kit rack and out in the weather for years without any attempt on my part to get them in under cover. So I'll be attempting to undo what can only be described as abuse.

Guilty as charged.

I have some rot that goes very deeply into the handle of my USGI shovel (which is a darned shame and I'm completely at fault for that). They're expensive and I did myself NO favors by leaving it out in the weather. Luckily, that's all the damage there is. It wouldn't be tough to replace it except for replacing the pin with something that doesn't look like a nut and bolt. There is always the weld-a-washer-onto-a-pin option for disguising the repair but at the moment, I have a product on my shelf that I've wanted to try and this is exactly the job for it.

Home Depot's claim for this is simple - Repairs wood rot or wood decay on interior or exterior wood (Har dee har-har). Stops wood rot (and I'm throwing a Bee Ess flag on that claim as well). Binds wood fiber to repair and fill wood damage (I'm counting on it). Easy to apply (how very true). Dries in 2 hours - sand, stain or paint after use (instructions say 2-4 hours). A possible drawback is that it does darken the wood if that matters to you. I'm going with a completely painted finish.
IMG_3075.jpeg
Clean up is easy. Don't clean anything up. Instead, throw it away.
IMG_3076.jpeg
IMG_3077.jpeg
Rotting wood is just that - rotting. Until you remove all those oxygen molecules, oxidization is going to continue. So this stuff may slow it to a crawl but stopping it is a really bold claim. As to the claim that it "repairs wood rot" why would you want to? I want the rot gone.

So, the situation on the shovel handle is simple. Water made its way to the retaining pin through one, or both ends, then migrated to the interior and rotted the handle from the inside out. At the lowest point in the handle (the shovel was stowed face down) the rot went through and through.

There's still a lot of wood there and I have a product I want to try so here's the plan. I will remove the rot and the soft stuff with a Dremel Tool and a burr bit and get back to good wood. That means gutting the handle like a fish. :roll:

Now, if you don't have a Dremel tool, ask for one. Christmas is coming. It's a far better gift than a Norelco Electric Razor or some stupid necktie. Or, you can get one for your wife as an anniversary gift (and then use it without asking). As long as the couch is comfortable for sleeping, I say GO FOR IT! But seriously, I get a lot done with Dremel's lower end model and friends, this is not the tool to try to get some version of at Harbor Freight on the cheap. *end uncompensated advertisement for Dremel Tool Products*

I will stabilize the remaining wood with the wood hardener and then fill the void with Bondo. Don't laugh. Bob Vila says it works well with wood and I've tried it before. The results were nothing short of amazing then and I'm expecting the same amazing results this time.

https://www.bobvila.com/slideshow/small ... ucts-48569

Now, back to the Varathane Wood Hardener. This certainly isn't the only kind of wood hardener out there. I found mine on sale which was really my only criteria when I bought it. I'm a cheapskate. I didn't have a job for it when I bought it but I knew, sooner or later, I would. Minwax brand wood hardener gets high marks on the internet as do others. Varathane doesn't even make the top ten. Meh. If it soaks in and hardens, I'm good. This is not fine furniture we're dealing with here and at this point in my life, I'm not digging holes with a shovel... Nope. So, the pioneer kit is just for show.

Prep your the wood to be treated by sanding off whatever coating was on there previously. This stuff isn't going to magically get past varnish, or paint or urethane. Application requires a small disposable brush (any small brush you can just throw away will do nicely) and a disposable cup-sized container. The liquid contains acetone so doing this in an open air setting is best unless you're one of those people. Consistency of the liquid is just a bit thicker than water. Apply with a brush and watch it soak in. Goes on smooth. Soaks in quickly. Drips can form as it dries if you are applying more than the wood can take, so use care to avoid them. It does not have the consistency that makes it capable of filling cracks in the wood, by the way.

I believe this is probably just a thinned out cyanoacrylic acid meant to soak in and glue everything together from the inside out and it does soak in. You will be able to see where the super-dry wood is hungry for more. As long as the wood is drinking it up, keep putting it on there.

I got some on my hands and in the spirit of discovery, I allowed it to stay there and placed my thumb-to-forefinger together just to see if it would bond. It did, but only lightly, so this stuff isn't exactly 'superglue'.

To be continued, with pics of the work.
You do not have the required permissions to view the files attached to this post.
Last edited by m3a1 on August 14th, 2020, 6:55 pm, edited 6 times in total.

User avatar
m3a1
Lt. General
Lt. General
Posts: 4044
Joined: August 7th, 2014, 6:36 pm

Re: Beverly Hillbillies

Unread post by m3a1 » August 14th, 2020, 1:09 pm

Here's the handle.
IMG_3074.jpeg
In this photo you can see how thirsty some of that wood really is.
IMG_3078.jpeg
The interior was so thirsty I just poured the stuff right in and sloshed it around.
IMG_3082.jpeg
The axe will need some special attention where these gaps are.
IMG_3079.jpeg
This really drank it up.
IMG_3080.jpeg
So, we're in 'drying mode' at the moment. More to come.

Cheers,
TJ
You do not have the required permissions to view the files attached to this post.
User avatar
m3a1
Lt. General
Lt. General
Posts: 4044
Joined: August 7th, 2014, 6:36 pm

Re: Beverly Hillbillies

Unread post by m3a1 » August 14th, 2020, 8:21 pm

Ok, the results are in!

Product Quality gets 10 out of 10 Jalapeños.

User Skill gets 5 out of 10 Jalapeños.

So, this stuff does exactly what I wanted it to do. I got a nail and started poking at the guts of that handle and the wood resisted probing in the same way you would expect healthy wood to resist. I'm very happy about that. The Bondo will have something to grab onto, unlike what I pulled out of there which was more like cork, rather than good, strong wood. There was some bubbling on the exterior. More about that in a moment.
IMG_3084.jpeg
Once sanded..
IMG_3086.jpeg
As for my skill at putting this on, here are the two issues working against a perfect result. (1) I am a glutton. (2) I am an extremist. I just cannot seem to make peace with the idea that more isn't necessarily better. The bubbling you see are a result of a previous coat trying to cure while I laid on another coat over the top of it. In short, I did nothing to help myself by being a pig about getting the job done and getting in a hurry and laying more when I just should have moved on to other things. The product simply won't allow it because each application must have oxygen to dry and the only way to achieve that is to lay on one coat and walk away and let it dry. Simple as that.
IMG_3085.jpeg
As for my being an extremist, I just should have let the product take its course, do its thing the way it is designed to do it and reap the rewards (which is kind of like operating a Gama Goat, I might add). I went the other way. The great glutton-like amounts I put on there did result in drips that I simply did not see and the result of that was, something like 6 hours later while I'm sanding, I found those drips were not dry beneath the top coat...they were more like putty, actually. So what would otherwise have been an easy light sanding became a session of having scrape the putty-like substance away here and there. That revealed a very nice surface but again, I would have been way ahead to just slow things down, apply one coat and let it dry. That's the only way this stuff works.
IMG_3087.jpeg
Bottom line, this stuff needs oxygen to cure thoroughly. Deprive it of oxygen with a second coat applied too soon and you'll have bubbles. Lay it on too thick and you'll have drips. It absolutely DOES leave you with a good hardwood surface. It absolutely does NOT fill cracks (which it makes no claim to do) but you can bet your bottom dollar the insides of those cracks are not porous. I'm a believer.

So, I've sanded these guys down and I'm going to let them dry overnight. It's too late to do anything with these now anyway. Tomorrow I'll put on a final coat (thinly, this time!) and after a final sanding it''ll be Bondo time for that handle and maybe I'll even address those little fissures in the wood elsewhere.

More to come!

Cheers,
TJ
You do not have the required permissions to view the files attached to this post.

User avatar
m3a1
Lt. General
Lt. General
Posts: 4044
Joined: August 7th, 2014, 6:36 pm

Re: Beverly Hillbillies

Unread post by m3a1 » August 15th, 2020, 11:16 pm

I returned to the shovel this morning and found that a portion of it was still in drying mode when I put it up for the night. Some time after I sanded it and put it away, more bubbling took place, pushing some of the hardener up and out of fissures in the wood. This required a second round of sanding, but only in that area. This kind of drives home the point that doing more than applying a single coat and letting it dry thoroughly does nothing to make the job go faster.

Here, we have the Bondo filler applied and the first light sanding and shaping. Naturally, it was Texas Hot and the Bondo set up very quickly. By this time tomorrow it will be hard as a rock.
IMG_3088.jpeg
A light application of glaze will fill in any irregularities. I don't what this to be perfectly perfect. Having it shaped so that one's eye isn't drawn to it will do nicely. Eventually, the entire tool will be painted. No natural wood showing.
You do not have the required permissions to view the files attached to this post.

Hambone
Brigadier General
Brigadier General
Posts: 2511
Joined: October 1st, 2010, 12:19 am
Location: El Dorado, Arkansas

Re: Beverly Hillbillies

Unread post by Hambone » August 16th, 2020, 8:57 am

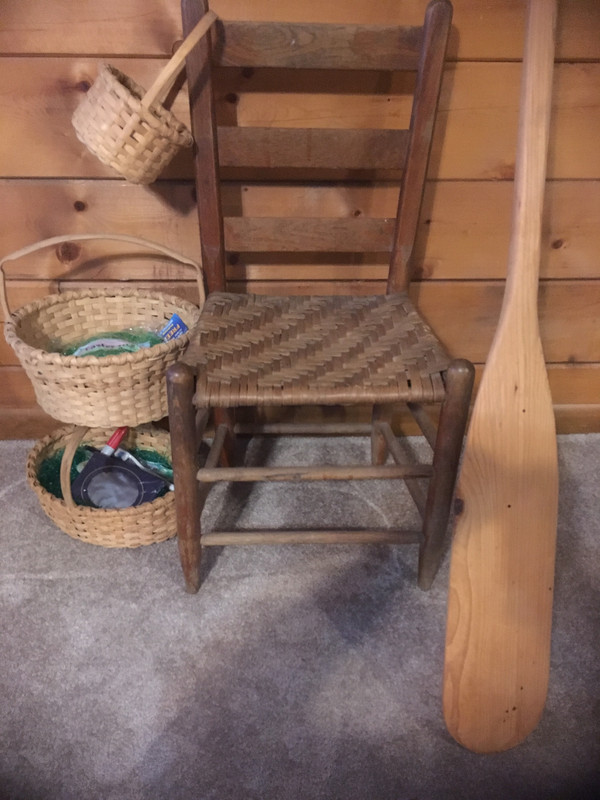
Back in the day, my dad or granddad would have whipped you up some new handles, we never bought handles for axe, shovel or hoe, even made all our boat paddles. They even made baskets and chair bottoms out of splits, everything was made of white oak, sometimes they would soak the wood in the pond, think it would make the wood split better. It's a lost art, wish I would have paid better attention, here is an example of some of their work. Yes, we were country. :lol:
Image

User avatar
m3a1
Lt. General
Lt. General
Posts: 4044
Joined: August 7th, 2014, 6:36 pm

Re: Beverly Hillbillies

Unread post by m3a1 » August 16th, 2020, 11:50 am

Lost art... Oh boy, you've got that right. My father dabbled in it in a time before these fancy new-fangled products were on the shelves. When you think about it, with today's technology, those of us who can take machines apart, renew them and put them back together again are a dying breed as well!

Dad used to drag me along with him to the hardware store. I say "drag" because, left to my own devices, I would have very much preferred to be riding my bike and doing all the 'kid stuff'. Now, I see the benefit of it because I'm older and those places and the things that went on in them are now so very few and far between.

We had an 'old school' hardware store in our community. It was one of those places filled with mysteriously strong odors that were pleasant or unpleasant depending upon where you were in the store. The odors of fresh cut wood, steel, oil, paint, varnish, and solvents permeated the place. There was a huge stack of small drawers that went all the way to the ceiling and we're not talking about low ceilings, but high, oh so VERY high, with pressed sheets of tin sheeting covering it and faux crown mouldings, also made of tin, wherever the tall stacks of drawers weren't. That thing took up all the wall space on both sides of the store which was three, maybe four times as deep as it was wide.

The drawer stacks were of a nicely finished golden oak and each drawer had a small black drawer pull and a little card holder with a little card that told you what was in that drawer. How many kinds of hardware can there be? Everything from A to Z! There must have been thousands of them. And then there were those crazy spindly looking ladders that were reinforced with steel rods (and with cast iron wheels!) that ran on a track at the top and bottom.

As a kid, I wanted to get up there so badly, just for the view and never once got to do it. House Rules: We kids weren't allowed on the ladder..no way, no how. But it was still fun to watch a guy climb up and then bet whether or not he would have to pull himself one way or another to reach the correct drawer. We knew the theory was sound but that didn't happen very often. They guys who worked there knew were everything was so it was - move the ladder, go up the ladder, get the thing and then down again.

The basement, usually off limits in any other kind of store, was also a wonderful place for a kid to explore. It was lit by bare bulbs in simple ceramic fixtures powered by what we would today consider to be old-style wiring tied to ceramic insulators with yet another piece of wire. Everything contained asbestos back then. The wiring was insulated with it. And yet, somehow we survived! The insulators were screwed into the floor joists above and each fixture had a pull chain that really called out to be pulled by a kid who happened to be passing by. if it was off, you turned it on. If it was on, you turned it off...just for the fun of it. Even better if a little brother was a few steps behind and (by a pull of the chain) you left him in the dark.

In these ancient catacombs you could actually see how the place was put together (a learning experience in and of itself). No finished ceilings in this deep, dark place! There were wooden kegs of nails, large rolls of fence wire, T-posts, and bales of wire of all sorts, law mowers, lawn furniture, just infinitos rerum. All of it was there in the shadows, waiting to be found and all of it needed to be examined in great detail by a kid. Crowding around things, we must have looked like apes contemplating complex machinery.

The stairs to the basement were broad and open and constructed of thick, rough cuts of wood to take the weight of loaded hand trucks being wrestled by men with big bellies. These stairs were constructed without a kick plate (or 'kickers' as we called them). There was also a ramp alongside with a tin surface for who-knows-what. It was kept polished by whatever burlap bags were slid down it. The idea that we too might get a burlap bag sleigh-ride down it was tantalizing, but out of reach. This too, was strictly forbidden which had something to do with its being "dangerous."

Break that rule in this place and you'd never be invited back (which, for one thing, meant no more of the free peanuts this place supplied to the customers) and your father would be ashamed of you in front of the locals. All of which was not true, of course (because, back then, it was recognized that kids will be kids and folks didn't get to worked up about kids and shenanigans) but we were allowed to believe it and so, we stayed off the thing. But, Oh BROTHER, did it call to us! Sliding down that ramp was the second of the three things that were absolutely forbidden in the hardware store.

We always imagined a horrible death might await any kid foolish enough to break that rule. Would we be shredded by an open seam in the tin? Would we be smashed to bits against the concrete floor at the bottom, or perhaps horribly impaled upon a bale of barbed wire carelessly placed at its base? There, our shredded, broken, punctured bodies would be found, floating in a sea of our own blood. How wonderfully epic a death that would be. Such a demise would be legendary and animatedly discussed amongst our peers once the school year began. It would become a story told and retold by our friends and relatives during holiday gatherings and maybe...maybe it would even make it into the local newspaper! YOUTH FOUND SHREDDED, SMASHED AND IMPALED IN BASEMENT OF LOCAL HARDWARE STORE would be the headline! Death was always an acceptable outcome to kids, but back then, dishonor... was not. So, we kept our distance.

Now, if a sibling or a friend came along to the hardware store, the first kid down those stairs might get a chance to scare the other by turning off a light at the base of the stairs and then running around beneath them to reach through the opening where the kicker should have been (Boo-gah-Boo-gah-BOO-gah!) and maybe tickling an ankle of the second kid as he descended. So the second kid's only defense was to literally run down the stairs into the twilight, two steps at a time in a sort of zig-zag, Cirque du Soleil fashion. It was terrifying, even if you knew it was only another kid under there.

The final thing that was forbidden was a large freight elevator constructed of dark, oiled wood and huge straps of black steel bolted together with square headed bolts. It was human-powered by means of large ropes and even larger pulleys. I never got to see it work but its mere presence was proof that such a mysterious arrangement of ropes and pulleys could and would lift amazing loads. I would think of it when we were taught about that sort of thing in school. Ha! Ropes and pulleys were 'old hat' to me and because of the hardware store, I already knew about such things...and at such a young age!

Back upstairs, there was a veritable forest of brand new zinc coated garbage cans (those big heavy duty jobs, not the cheap tin ones we have today). They were everywhere, filled with axe handles, brooms...and, OH BOY!...one strategically placed with and filled with PEANUTS in the shell with a silver scoop and little brown paper bags to put the nuts in! I really dug in one day and was disappointed to find the peanuts were only about a foot deep. Another lesson from the hardware store. Things are not always as they seem. But as for those peanuts, there was a very pleasant reality. A kid could have as many as he wanted and no one said a thing if we dribbled peanut hulls on the floor. That floor was the prettiest wood, worn to baby-butt smoothness from a million broomings with corn straw brooms and the comings and goings of people who needed a geegaw or a gimcrack to improve their lives. No plastic brooms back then. The only place I ever saw smoother wood was in the feed area of the loafing shed on Bob & Jean Rhode's dairy farm and that came from sliding a billion bails of hay down to feed the cows.

And, of course there were always a few local guys just hanging around the hardware just for the camaraderie of it, or for a little bit of time away from the farming. Everyone had immaculate hair cuts. I suppose they also came into town for a trim and then just kind of migrated over to the hardware store to catch up on the local news. If Dad had a question, everybody there had an answer and because everybody knew everybody else in our town there were no B.S. answers. Back then, if you didn't know what you were talking about, most people would have the good sense to just shut up, or be held accountable for being wrong, later.

No blister packs with three bolts. No blister packs with four nuts. No taking advantage. No, Made In China stuff. You got your money's worth. No fooling around about that. Fair and square. If you wanted a dozen, it was always at least a baker's dozen and it came in a brown paper bag, weighed on a scale. If you wanted more, it came in a brown paper bag within yet another brown paper bag. Dad saved those bags and Mom flattened them, folded them and set them, like soldiers standing in neat rows under the kitchen sink, to be reused for lunch bags. To quote Cookie in the movie City Slickers - "You ain't gonna get any nouveau, amandine, thin crust, bottled water, sauteed city food. Food's brown, hot, and plenty of it." Cookie would have been right at home in our hardware store!

Yes, I certainly could have replaced the handle (I do have donor shovels hanging around) and that might yet happen, but we wouldn't have had the fun of examining this other option and doing a small article on it.

Cheers,
TJ
Last edited by m3a1 on August 16th, 2020, 9:18 pm, edited 8 times in total.

Hambone
Brigadier General
Brigadier General
Posts: 2511
Joined: October 1st, 2010, 12:19 am
Location: El Dorado, Arkansas

Re: Beverly Hillbillies

Unread post by Hambone » August 16th, 2020, 12:43 pm

TJ
That is a great story and very interesting, brought me back to my early memories of the local feed/hardware store, my granddad would visit every Saturday. The first thing I was drawn to was putting my fingerprints on the candy counter, you could buy candy pound and yes, it was put in a paperbag. I remember in the 60's they were still pulling up in model T's/A's, there was nothing like a trip to town for a country kid. I remember they would load our feed with a wooden wheelbarrow, even had a wood spoke wheel with a metal band, not painted, just weathered wood. One day we pulled up and the owner was upset because someone backed up over the wheelbarrow and broke the spokes in the wheel, to the rescue was my granddad. He took the wheel home and repaired it with new spokes, they continued to use the wheelbarrow for many years with the new spokes sticking out like a sore thumb, I'm sure they outlasted the other old wood. Gone are the good old days when all transactions were face to face and a handshake sealed all deals, now it's shipped to your house in 2 days, never know what you're going to get, and yes, it's made in CHINA. :roll: Hambone

User avatar
m3a1
Lt. General
Lt. General
Posts: 4044
Joined: August 7th, 2014, 6:36 pm

Re: Beverly Hillbillies

Unread post by m3a1 » August 16th, 2020, 1:44 pm

Those good old days! They had a certain balance to them that helped keep things running smoothly. To be completely fair and completely honest, we acknowledge that they were not ALL good and certainly not good for everybody. But life, and societies are a process. Now we're trying achieve a new balance in our society and at the moment, the needle on the scale is all over the place. Hang tight, men. It's coming, that 'new balance'. And we can get back to good times where quality, not quantity, is what counts.

Hope you have a lovely day, fellas. I am putting putty in cracks in wood at the moment (which is hardly worth a photo) and waiting for it to dry. They're going to turn out really nice.

Cheers,
TJ
Last edited by m3a1 on August 19th, 2020, 1:45 am, edited 1 time in total.

User avatar
rickf
General
General
Posts: 19776
Joined: November 26th, 2007, 1:28 pm
Location: Pemberton, NJ.

Re: Beverly Hillbillies

Unread post by rickf » August 16th, 2020, 6:26 pm

Had one of those very same hardware store right here where I live now until the owners got greedy and sold out. Didn't work out as well as they thought since the jobs they took didn't pan out. That hardware store was always packed and once they knew you it was "you know where it is" and off you went to get it. Nobody kept tabs on where you were, they trusted you were not getting into something you shouldn't. That building was always heated with a huge wood stove in the basement and it was three stories tall but they were very tall stories. 12 foot ceiling every story. It had all the smells you were talking about. That building is still there sitting empty.
1964 M151A1
1984 M1008
1967 M416
04/1952 M100
12/1952 M100- Departed
AN/TSQ-114A Trailblazer- Gone

User avatar
m3a1
Lt. General
Lt. General
Posts: 4044
Joined: August 7th, 2014, 6:36 pm

Re: Beverly Hillbillies

Unread post by m3a1 » August 17th, 2020, 2:22 pm

Got back out to the pioneer kit project today and sanded the last coat of putty down. It has taken more than one because I missed some spots. The putty I'm using is Bondo Glazing & Spot Putty and I've been applying it to the fissures in the wood with my finger. I'm finding I have a lot more control of it that way. The stuff really works well and you use it straight from the tube (a little larger than a large tube of toothpaste). No complaints.

I think what I've achieved thus far is as far as I'm going to go. It would be possible to do too much so that, after paint, the wood handles wouldn't have the appearance of being wood but instead, look like they were constructed of a more modern material. I don't want that. They're going on a vehicle made in 1970 and I want to keep some old-school definition in that regard.

After a first coat of paint they don't look like they've been repaired which is almost what I'm going for. The Bondo body filler is sucking up the paint as it so typically does but after a few coats all will blend in.

But unfortunately, since I'm using a rattle can, the tools are missing the drips and irregularities that in-service pioneer tools always seem to have because they've been painted by a bunch of unfortunates who got rounded up for the task of painting tools and who would much rather be doing something else with their time. In short, the tools are really looking too pretty.

Maybe at some point I'll stumble upon some paint in cans that can be applied by a brush. But things are coming right along. I'm going to let coating number one dry all day and then maybe let coating number two dry all night.

Cheers,
TJ

User avatar
rickf
General
General
Posts: 19776
Joined: November 26th, 2007, 1:28 pm
Location: Pemberton, NJ.

Re: Beverly Hillbillies

Unread post by rickf » August 17th, 2020, 5:05 pm

Hold the spray can about three inches from the part and you will get the correct look. :lol:
1964 M151A1
1984 M1008
1967 M416
04/1952 M100
12/1952 M100- Departed
AN/TSQ-114A Trailblazer- Gone

User avatar
m3a1
Lt. General
Lt. General
Posts: 4044
Joined: August 7th, 2014, 6:36 pm

Re: Beverly Hillbillies

Unread post by m3a1 » August 18th, 2020, 9:48 am

:lol: :lol: :lol: :lol: :lol: :lol: :lol:

I believe you're absolutely right!

User avatar
m3a1
Lt. General
Lt. General
Posts: 4044
Joined: August 7th, 2014, 6:36 pm

Re: Beverly Hillbillies

Unread post by m3a1 » August 18th, 2020, 11:16 am

Yesterday I was cleaning up the pick mattock head in preparation for paint and noticed a big ol' casting mark that said "INDIA". :oops:

In my defense, I bought this thing years ago when I had an actual and immediate need for it...years before my back was blown out. I remember acquiring it to dig the hole I needed to bury Duke, one of the three Great Danes I had at the time. I know it sounds obvious, but Duke was deceased (yes, nowadays some people need to be reassured :roll: ) before I buried him and size-wise, Duke was big, even for a Great Dane.

Duke was a favorite of mine. He had a lot of youthful energy and was a bull in a china shop most of the time but he ended up having a bad ticker. So, he might be out romping around like a lunatic and then suddenly be Off, like a light switch. He would go from a full blown high speed running Great Dane to a large heap of dog flesh laying crashed upon the ground which, I must say, was a very distressing thing to watch. So, we went to the vet who dourly suggested Duke be put down because this ON-OFF situation would only result in repeated injuries to him. I hated to do it, held him while we did it, and cried a bit for having done it.

FUDGE.

Now, we get to the practical matter of dealing with the deceased. Simply put, having a dead animal of Duke's size laying around the place presents real problems, especially in the south Texas heat. It's not like a dead cat where one can simply put him in a shoe box, dig a tiny hole, say a few kind words and then it's 'th-th-th-th-that's all folks'. Duke's mortal coil was going to require a large hole. So, we took advantage of the facilities of a vet who has a large freezer just for such circumstances.

The misfortune of the matter was that one of the vet's less-experienced minions put him in the freezer rather thoughtlessly. When I went to pick him up, I found he was frozen in more of large-Great-Dane-standing-position than a convenient for burial, large-curled-up-and-sleeping-Great-Dane-position. :shock: I cannot remember why the obvious option of thawing and re-freezing him was off the table but it wasn't an option.

DOUBLE FUDGE.

So the hole I dug initially wasn't going to get the job done and it was going to have to be far bigger than I had imagined. Unfortunately, there was the small matter of a rock ledge I was up against on one end, or excavating beneath my driveway on the other. Call me fickle, but I just didn't have it in me to have to wait for him to thaw in order to rearrange him, or have to risk looking into a dead eye and being judged for being complicit in his death, or to have to struggle with a shovel a moment longer where a shovel so clearly would not do.

But, if there's a bright spot in this tale, I will say, there's really nothing like digging a large grave or busting up subterranean rock under the Texas sun to take one's mind off the mourning. Which brings us back to the matter of my acquiring the INDIA pick mattock.

I'm not a picky pick mattock picker when I need to pick out a pick mattock, so Made in INDIA vs Made in USA didn't enter into my thinking when I picked this particular pick mattock. When you need a hole dug, and dug quickly, it's 'any port in a storm'. So, I bought it and Made in INDIA without any plan other than getting a hole dug... bigger.

But now, to hang this thing on my Made in the USA Gama Goat seems a travesty, chiefly because the casting mark is so glaringly obvious. Somebody will notice it. They always do.

But I'm not above cheating to resolve such minor matters, so out came the Bondo (again) and I doped it up, sanded it off and then skinned it with Bondo's Glazing Putty to hide the margins. Haven't gotten around to sanding that off yet but a I'm sure a picture will soon be on the way... of the pick mattock...(not the dog it was used to bury).

Cheers,
TJ
Last edited by m3a1 on August 19th, 2020, 1:54 am, edited 6 times in total.

1SGCAV77
Sergeant First Class
Posts: 200
Joined: January 25th, 2020, 8:56 am
Location: Waco, TEXAS

Re: Beverly Hillbillies

Unread post by 1SGCAV77 » August 18th, 2020, 2:57 pm

For M3A1, I think. This is not intended to be a stupid question...it is ignorance. I don’t know. How do I know if I have a genuine USGI shovel? Went a trooper lost one he went to supply with his down trodden whoa as me story and got another. An enterprising trooper would go to hardware store, buy a D-handle shovel, paint OD. I known that story from experience. Did same thing for lost pliers and screw drivers. Oops got side tracked.
No....really....how do I know if genuine or a hardware store replacement. I have three that have USA stamped on them. All have #24087 faded paint job with at least one run.
MSG, USAR (Ret) 31Jan99
MOS- 63T5H
M151A1- Ford
M416-1967 CEMSCO

Post Reply